")


")


Let me tell you about the dinner that single handedly saved my busy weeknights. It was one of those evenings where I had absolutely no plan, a package of chicken breasts thawing on the counter, and a serious craving for something flavorful but fast. I wanted the kind of sticky, savory sweet, takeout style chicken that usually requires a phone call and a wait. That’s when I remembered this Instant Pot Soy Ginger Chicken recipe. In under 30 minutes, my kitchen smelled like the best Asian restaurant, and I had tender, juicy chicken smothered in a glossy, irresistible sauce. It was a revelation. This recipe has since become my secret weapon for those nights when I need to get dinner on the table fast, without sacrificing an ounce of flavor. It’s proof that with a handful of pantry staples and your Instant Pot, you can create magic.
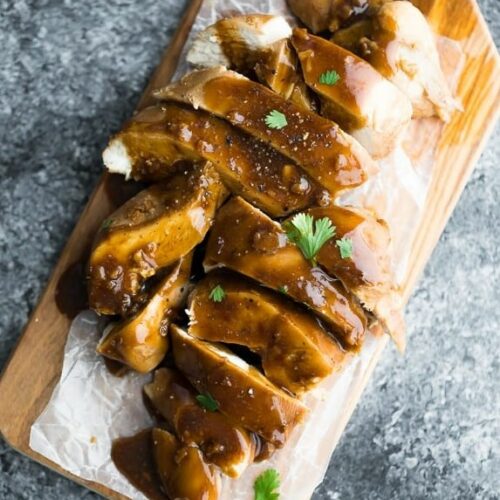
Let’s talk about why this dish is so addictive. The flavor is a perfect umami packed balance of savory and sweet. The rich, salty depth of soy sauce is beautifully complemented by the warm, aromatic punch of fresh ginger and a hint of garlic. A touch of brown sugar (or honey/maple syrup) adds a gentle sweetness that rounds everything out, while a final whisper of sesame oil brings that classic, nutty toasty note. The texture is just right: the chicken comes out of the pressure cooker incredibly tender and juicy, and after a quick rest, it’s sliced and tossed back into a luscious, thickened, sticky glaze that coats every single piece. Served over a bed of fluffy rice, it’s pure comfort and satisfaction.
Secrets to Instant Pot Soy Ginger Success
These pro tips are your guarantee for perfect, restaurant quality results every single time.
- Use Reduced Sodium Soy Sauce: This is crucial. Regular soy sauce can easily make the dish overwhelmingly salty. Using reduced sodium allows you to control the seasoning and lets the ginger, garlic, and other flavors shine through beautifully.
- Grate Your Ginger Fresh: For the brightest, most aromatic ginger flavor, you absolutely must use fresh ginger and grate it finely. A microplane or the small holes on a box grater is perfect for this. The pre minced stuff in a jar just won’t give you the same punch.
- Don’t Skip the Quick Release: Performing a quick pressure release as soon as the cooking cycle ends is essential. It stops the cooking process immediately, ensuring your chicken breasts stay perfectly tender and don’t overcook.
- Remove the Pot to Thicken the Sauce: After you’ve added the cornstarch slurry and the sauce has thickened, lift the stainless steel insert out of the Instant Pot base (using oven mitts!). This stops the “sauté” function’s residual heat from over reducing or potentially burning your beautiful sauce.
Make Ahead, Storage & Freezing Instructions
This dish is a meal prep superstar. Here’s how to plan like a pro.
- Make Ahead Champion: You can cook this recipe ahead of time and portion it out with rice and veggies for easy weekly meals. Alternatively, you can store just the protein and sauce to add to fresh sides later.
- Storing Leftovers: Cool the chicken and sauce completely, then store in an airtight container in the refrigerator for up to 4 days. Pro tip: wait until the chicken is completely cold to slice it; this helps retain its juices and keeps it nice and moist for reheating.
- Reheating: Reheat gently in the microwave until steaming hot. It’s best not to reheat more than once.
- Freezer Instructions (Cooked): You can freeze the cooked chicken and sauce for up to 3 months. Make sure it’s in a freezer safe container with plenty of sauce to keep the chicken from drying out. Thaw overnight in the fridge before reheating.
- Freezer Meal (Uncooked): This recipe is perfect for assembling as a freezer Instant Pot meal! Add all ingredients (except the cornstarch and water for the slurry) to a sturdy freezer bag. Squeeze out the air, seal, and freeze for up to 3 months. Thaw for 24 hours in the fridge, then dump the contents into your Instant Pot and cook as directed.
Step by Step Instructions
Prep Time: 10 minutes | Cook Time: 8 minutes (plus time to come to pressure) | Total Time: ~25-30 minutes
Follow these simple steps for perfect, saucy chicken every time.
1Assemble in the Pot: In the stainless steel insert of your 6 quart Instant Pot, stir together the soy sauce, water (or stock), brown sugar, grated ginger, minced garlic, and sesame oil. Stir until the sugar is mostly dissolved.
2Add the Chicken: Add the boneless, skinless chicken breasts to the pot and turn them a few times to coat them evenly in the sauce.
3Pressure Cook: Place the lid on the Instant Pot and ensure the steam release handle is set to the SEALING position. Select the PRESSURE COOK (or MANUAL) setting and set the time for 8 minutes at high pressure. The pot will take about 8-10 minutes to come to pressure before it starts counting down.
4Quick Release: When the cooking program ends, immediately perform a quick release by carefully turning the valve to VENTING. Stand back to avoid the steam. Wait for the pin to drop, then carefully remove the lid.
5Check and Rest Chicken: Using an instant read thermometer, verify the chicken has reached an internal temperature of 165°F (74°C) in the thickest part. Transfer the chicken to a cutting board and let it rest for at least 5 minutes.
6Thicken the Sauce: While the chicken rests, select the SAUTÉ function on your Instant Pot. In a small bowl, whisk together the cornstarch and 2 tablespoons of water to create a slurry. Once the sauce in the pot is simmering, slowly whisk in the cornstarch slurry. Stir continuously with a spatula for 1-2 minutes, until the sauce bubbles and thickens to a glossy, sticky consistency.
7Remove from Heat (Important!): Use oven mitts to carefully lift the stainless steel insert out of the Instant Pot base. This prevents the sauce from over reducing or burning from the residual heat of the “sauté” function.
8Slice and Toss: Slice the rested chicken breasts against the grain into strips or bite sized cubes. Return the sliced chicken to the pot with the thickened sauce and toss everything together until every piece is well coated.
9Serve: Serve immediately over steamed rice or your favorite noodles, with a side of vegetables.
Customize It: Ingredient Substitutions
This recipe is wonderfully adaptable to different tastes and dietary needs.
- Gluten Free: This is an easy swap! Simply use gluten free tamari, coconut aminos, or a liquid soy seasoning in place of the regular soy sauce.
- Dairy Free: This recipe is naturally dairy free!
- Paleo: To make this recipe paleo friendly, substitute the soy sauce with coconut aminos. Use maple syrup instead of brown sugar. You can also thicken the sauce with arrowroot starch (use 1 teaspoon arrowroot in place of the 2 teaspoons of cornstarch).
- Common Pantry Swaps:
- Protein: Boneless, skinless chicken thighs work beautifully and are even more forgiving. Increase the cook time to 10 minutes with a quick release. This recipe is also fantastic with pork tenderloin.
- Sweetener: An equal volume of honey or maple syrup can be substituted for the brown sugar. Alternative sweeteners have not been tested but may work.
- Using Frozen Chicken: You can cook this recipe with frozen chicken breasts! If they are frozen individually, cook for 12 minutes with a quick release. If they are frozen together in a block, try 5 minutes high pressure with a quick release, then pry them apart and cook for a further 7-10 minutes, until they reach 165°F.
Serving Suggestions: How to Enjoy Your Bowl
This saucy chicken is incredibly versatile. Here’s how to make it a meal.
- The Classic Base: Serve it over a bed of fluffy jasmine or white rice, brown rice, or quinoa to soak up every last drop of that delicious sticky sauce.
- Add Veggies: It’s perfect with steamed or air fried broccoli, snap peas, or green beans. You can also stir in some shredded carrots or bell peppers at the end.
- Noodle Night: Toss the sauced chicken with cooked lo mein noodles, soba noodles, or even zucchini noodles (zoodles) for a different twist.
- Beverage Pairings: The savory, gingery flavors pair beautifully with a crisp, cold lager or pilsner. For wine, a slightly off dry Riesling or Gewürztraminer is a classic match. A refreshing sparkling water with a wedge of lime is perfect for a non alcoholic option.
- Garnishes: Sprinkle with toasted sesame seeds and sliced green onions just before serving for a pop of color and flavor.
Essential Equipment List
- 6 Quart Instant Pot (or any electric pressure cooker): The recipe is designed for this size. It has not been tested in an 8 quart model.
- Instant Read Thermometer: Essential for checking that your chicken has reached a safe 165°F (74°C) without guessing.
- Cutting Board and Sharp Chef’s Knife: For slicing the rested chicken against the grain.
- Small Bowl: For making the cornstarch slurry.
- Measuring Cups and Spoons
- Microplane or Box Grater: For finely grating the fresh ginger.
- Oven Mitts: For safely removing the hot inner pot when thickening the sauce.
- Spatula or Whisk: For stirring the sauce as it thickens.
Frequently Asked Questions (FAQ)
- Can I increase the serving size?
Yes, you can! Simply adjust the serving size slider on the recipe card, which will scale the ingredients for you. You should not need to increase the cook time, but always verify the chicken is cooked through with a thermometer. - Can I add vegetables to the Instant Pot with the chicken?
You could try adding vegetables like mushrooms, which tend to hold up well under pressure. However, I recommend against adding quick cooking vegetables like broccoli or carrots, as they will likely become very soft and mushy. It’s best to steam or stir fry them separately and add them at the end. - Can I make this in a slow cooker?
I believe so! You can add all the sauce ingredients and chicken to your slow cooker. Cook on LOW for 3-4 hours. Then, remove the chicken, transfer the liquid to a pot, and thicken it on the stovetop with the cornstarch slurry as directed. - My sauce isn’t thickening. What should I do?
Ensure your sauce is at a gentle simmer (not just hot) when you add the cornstarch slurry. Also, make sure you’re whisking it in well. Cornstarch needs heat and a little time to activate. If it’s still not thick after a minute, you can mix another teaspoon of cornstarch with a tablespoon of water and add it, whisking until it thickens.
Instant Pot Soy Ginger Chicken
Ingredients
- ⅓ cup reduced sodium soy sauce
- ⅓ cup water or low sodium chicken stock
- ¼ cup brown sugar packed
- 2 tablespoons fresh ginger finely grated
- 1 clove garlic minced
- 1 tablespoon sesame oil
- 1 lb boneless skinless chicken breasts (about 2 large)
After Cooking:
- 2 tablespoons water
- 2 teaspoons cornstarch
Instructions
- Assemble: In the insert of a 6 quart Instant Pot, stir together soy sauce, ⅓ cup water, brown sugar, ginger, garlic, and sesame oil until sugar is dissolved. Add chicken breasts and turn to coat.
- Pressure Cook: Secure the lid and set the valve to SEALING. Pressure cook on HIGH for 8 minutes.
- Quick Release: When the cooking cycle ends, immediately perform a quick release. Carefully turn the valve to VENTING. Once the pin drops, remove the lid.
- Check & Rest: Verify chicken has reached 165°F (74°C) with an instant read thermometer. Transfer chicken to a cutting board and let rest for 5 minutes.
- Thicken Sauce: Select the SAUTÉ function. In a small bowl, whisk 2 tablespoons water with cornstarch to make a slurry. Once the sauce is simmering, slowly whisk in the slurry. Cook for 1-2 minutes, stirring constantly, until the sauce thickens and becomes glossy.
- Remove Pot: Use oven mitts to carefully lift the inner pot out of the Instant Pot base to stop the cooking.
- Slice & Toss: Slice the rested chicken against the grain into strips or cubes. Return the chicken to the pot and toss to coat evenly in the sauce.
- Serve: Serve immediately over rice or noodles, garnished with sesame seeds and green onions if desired.
Notes
- Soy Sauce: Reduced sodium is recommended. For gluten free, use tamari, coconut aminos, or liquid soy seasoning.
- Chicken Thighs: Use boneless, skinless thighs. Increase cook time to 10 minutes with a quick release.
- Sweetener: Honey or maple syrup may be substituted in equal volume.
- Frozen Chicken: If cooking from frozen, ensure breasts are individually frozen. Cook for 12 minutes with a quick release, and verify they reach 165°F.
- Storage: Store leftovers in an airtight container in the fridge for up to 4 days, or freeze for up to 3 months.
- Freezer Meal: Combine all ingredients (except cornstarch slurry) in a freezer bag. Freeze for up to 3 months. Thaw 24 hours before cooking as directed.

")


")
