
")

")


Let me tell you about the first time I made corned beef in my Instant Pot. For years, I’d only made it the traditional way; simmering it on the stovetop for hours, or using the slow cooker, always crossing my fingers that it wouldn’t turn out tough and dry. It was a delicious tradition, but it was also an all day affair. Then, a few years ago, I decided to try it in my pressure cooker. I was skeptical, I’ll admit. Could it really transform that tough brisket into something tender and glorious in just over an hour? The answer was a resounding, life changing YES. The meat came out so incredibly tender, so perfectly juicy, that we’ve never gone back. This Instant Pot Corned Beef has become our go to for St. Patrick’s Day and beyond. It’s faster, it’s foolproof, and it’s hands down the best corned beef I’ve ever made. Now, I’m thrilled to share this magic with you.
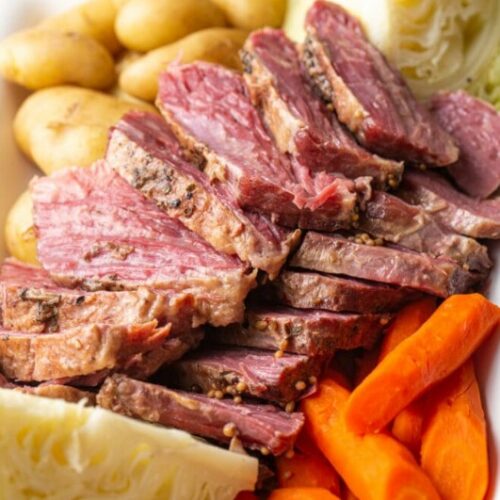
Let’s talk about why this corned beef is so special. The flavor is a perfectly savory, spiced masterpiece. The brisket is brined with its classic pickling spice packet, infusing it with those warm, aromatic notes of mustard seed, coriander, allspice, and bay. Pressure cooking it with onion and garlic creates an incredibly rich, deeply flavorful broth. The result is corned beef that’s meltingly tender, juicy, and packed with savory goodness. It practically falls apart under your fork. The vegetables; baby potatoes, sweet carrots, and wedges of Savoy cabbage; are cooked separately in the flavorful broth (or fresh water) until they are perfectly tender, soaking up all that delicious essence. Every single bite is pure, comforting, Irish inspired bliss.
Secrets to Perfect Instant Pot Corned Beef
These pro tips are your guarantee for a perfect, restaurant quality result every single time.
- Use the Pickling Spice Packet: Don’t even think about throwing away that little packet that comes with your corned beef. It’s packed with the essential spices that give corned beef its signature flavor. If you don’t have one, you can substitute with about 2 tablespoons of store bought pickling spice, tied in a cheesecloth bundle for easy removal.
- Natural Release is Non Negotiable: After the pressure cooking cycle ends, you must let the pressure release naturally for at least 15 minutes (or until the pin drops). This allows the meat to relax and reabsorb its juices, resulting in that ultra tender, fork tender texture. A quick release could make it tough.
- Cook Vegetables Separately (or Use the Trivet): The vegetables cook much faster than the beef. Cooking them separately (either in the reserved broth or using the trivet) ensures they are perfectly tender, not mushy, and don’t get lost in the long cook time.
- Slice Against the Grain: This is crucial for any brisket. Once the meat has rested, look for the direction of the muscle fibers and slice perpendicular to them. This shortens the fibers and makes each bite incredibly tender, rather than long and stringy.
Make Ahead, Storage & Freezing Instructions
This dish is great for meal prep and the leftovers are legendary.
- Make Ahead Champion: You can cook the corned beef up to 3 days in advance. Cook it fully, let it cool, then wrap it tightly in foil and store it in the refrigerator. Slice and reheat gently in a low oven or with a splash of broth in a covered dish. Cook the vegetables fresh for the best texture, or reheat them gently as well.
- Storing Leftovers: Store any leftover corned beef and vegetables in separate airtight containers in the refrigerator for up to 4 days. The meat is delicious cold in sandwiches or hash.
- Reheating: For best results, reheat sliced corned beef in a covered dish in a 300°F oven with a splash of the reserved cooking liquid or broth, until warmed through. You can also reheat gently in the microwave.
- Freezing Instructions: Cooked corned beef freezes beautifully for up to 3 months. Slice it or leave it whole, wrap tightly in plastic wrap and then foil, and place in a freezer bag. Thaw overnight in the refrigerator before reheating. The vegetables do not freeze well.
Step by Step Instructions
Prep Time: 10 minutes | Cook Time: ~1 hour 40 minutes (plus NPR) | Total Time: ~2 hours
Follow these simple steps for the most tender, flavorful corned beef.
- Build the Base: Add the chopped onion, chopped garlic, and the contents of the corned beef pickling spice packet to the stainless steel insert of your 6 quart Instant Pot. Pour in 4 cups of hot water. Stir in the salt and pepper.
- Add the Brisket: Place the corned beef brisket on top of the onions and spices. It’s okay if it’s not completely submerged.
- Pressure Cook: Secure the lid and set the steam release handle to the SEALING position. Select the PRESSURE COOK (or MANUAL) setting and set the time for 85 minutes for a 4 lb brisket, or 80 minutes for a 3 lb brisket. (Note: If your brisket is thicker than 1.5 inches, you may need to add an extra 5-10 minutes. You can always check and cook a little longer if needed.)
- Natural Release: When the cooking program ends, allow the pressure to release naturally for at least 15 minutes (or until the float valve drops). Do not quick release!
- Check and Rest: Carefully open the lid. The meat should be fork tender. If it’s not quite done, you can pressure cook it for another 5-10 minutes. Use tongs to carefully transfer the corned beef to a cutting board or platter, and tent it loosely with foil to keep it warm.
- Prepare for Veggies: Carefully pour off all but about 1 cup of the cooking liquid from the pot. (You can strain and reserve the rest for another use, like soup!) Alternatively, you can use 1 cup of fresh water.
- Cook the Vegetables: Place the trivet or a steamer basket in the pot. Arrange the baby potatoes, carrot pieces, and cabbage wedges on the trivet (or place them directly into the liquid). Secure the lid and set the valve to SEALING. Pressure cook on HIGH for 3 minutes.
- Quick Release and Check: Perform a quick release of the pressure. Carefully open the lid. Check the vegetables; they should be tender. If they need a minute more, you can put the lid back on (without pressure) and let them steam in the residual heat, or pressure cook for another minute.
- Slice and Serve: Remove the foil from the corned beef. Slice the meat against the grain into ¼ inch thick slices. Serve immediately with the hot vegetables and, if desired, a little of the reserved cooking liquid or your favorite mustard.
Customize It: Ingredient Substitutions
This recipe is wonderfully adaptable to different tastes and dietary needs.
- Gluten Free: This recipe is naturally gluten free! Just double check that your corned beef and its pickling spice packet are certified gluten free, as some brands may use additives or spices processed in facilities with gluten.
- Dairy Free: This recipe is naturally dairy free.
- Vegetable Variations: Feel free to swap in other hearty vegetables. Parsnips, turnips, or chunks of rutabaga are all delicious cooked this way. Add them with the potatoes and carrots.
- Common Pantry Swaps:
- Cabbage: Savoy cabbage is lovely and tender, but regular green cabbage cut into wedges works perfectly. You could also use Brussels sprouts (halved) for a different twist.
- Onion: A large yellow or white onion is standard, but you could use a large shallot or even a leek (white parts only, cleaned well).
- Liquid: If you don’t want to use the reserved cooking liquid for the vegetables, fresh water or beef broth are both excellent choices.
Serving Suggestions: How to Build Your Corned Beef Feast
This classic dish is a meal in itself, but it’s wonderful with a few traditional sides.
- The Classic Pairing: Serve it with a side of creamy mashed potatoes or buttered egg noodles to soak up any extra juices. Don’t forget the spicy brown mustard or horseradish sauce on the side!
- Add a Green: A simple side of buttered peas or sautéed green beans with a little lemon zest would be a lovely, fresh complement.
- For Leftovers: The leftover corned beef is legendary for Reuben sandwiches (with rye bread, Swiss cheese, sauerkraut, and Russian dressing) or a hearty corned beef hash with fried eggs.
- Beverage Pairings: The rich, savory flavors are a perfect match for a stout or Irish dry stout (like Guinness). For a non alcoholic option, a sparkling apple cider or a rich root beer is festive and delicious.
Essential Equipment List
- 6 Quart Instant Pot (or any electric pressure cooker): The recipe is designed for this size.
- Tongs: For safely handling the hot brisket.
- Trivet or Steamer Basket: For cooking the vegetables above the liquid (optional, but helps them steam rather than boil).
- Cutting Board and Sharp Chef’s Knife: For slicing the rested brisket against the grain.
- Foil: For tenting the cooked meat to keep it warm.
- Measuring Cups and Spoons
- Chef’s Knife and Cutting Board: For prepping the onion, garlic, carrots, and cabbage.
Frequently Asked Questions (FAQ)
- Can I use a different cut of corned beef?
This recipe is designed for a corned beef brisket, which is the most common cut. A point cut is thicker and fattier, while a flat cut is leaner and more uniform. Both work; just be sure to check for tenderness and add time if needed, especially for a very thick point cut. - My corned beef came out too salty. How can I prevent that?
Corned beef is brined, so it is naturally salty. Using the recommended amount of water (4 cups) is important. If you are very sensitive to salt, you can soak the brisket in cold water for 1-2 hours before cooking, changing the water once. This will draw out some of the excess salt. Also, do not add extra salt to the cooking liquid. - Can I cook the vegetables with the meat to save time?
I don’t recommend it. The meat needs to cook for 80-90 minutes, which would turn the vegetables into complete mush. Cooking them separately for just 3 minutes ensures they are perfectly tender and not overcooked. - How do I know when the corned beef is done?
It should be fork tender. You should be able to easily pierce it with a fork or knife, and it should feel like it wants to pull apart. Using an instant read thermometer, it should reach an internal temperature of at least 190°F-205°F for that perfect, shreddable texture.
Instant Pot Corned Beef
Ingredients
- 3-4 lb corned beef brisket with pickling spice packet
- 1 large yellow onion chopped
- 4 cloves garlic chopped
- 4 cups hot water
- 1 teaspoon salt
- 1 teaspoon black pepper
Vegetables to Serve:
- 1 pound baby potatoes
- 1/2 head Savoy cabbage cut into wedges
- 4 large carrots cut into 3 inch pieces
Instructions
- Build Base: In a 6 quart Instant Pot, combine onion, garlic, contents of pickling spice packet, hot water, salt, and pepper. Stir.
- Add Beef: Place corned beef brisket on top of the onions.
- Pressure Cook: Secure lid, set valve to SEALING. Pressure cook on HIGH for 85 minutes (for 4 lb) or 80 minutes (for 3 lb). (Add 5-10 minutes if brisket is very thick.)
- Natural Release: When cook time ends, allow pressure to release NATURALLY for at least 15 minutes (until pin drops). Do not quick release.
- Rest Meat: Carefully open lid. Transfer beef to a cutting board and tent loosely with foil to keep warm.
- Prepare for Veggies: Carefully pour off all but 1 cup of cooking liquid from the pot (or use 1 cup fresh water).
- Cook Vegetables: Place trivet or steamer basket in pot. Arrange potatoes, carrots, and cabbage on trivet (or place directly in liquid). Secure lid, set valve to SEALING. Pressure cook on HIGH for 3 minutes.
- Quick Release & Check: Perform a quick release. Carefully open lid. Check that vegetables are tender; if not, let steam for a few minutes or cook for 1 more minute under pressure.
- Slice & Serve: Remove foil from beef. Slice thinly against the grain. Serve immediately with hot vegetables.
Notes
- Spice Packet: Don't discard the pickling spice packet; it's essential for flavor.
- Natural Release: This step is crucial for tender meat. Do not skip it!
- Storage: Store leftover meat and vegetables separately in the fridge for up to 4 days. Meat freezes well for up to 3 months; vegetables do not freeze well.
- Slow Cooker Option: See blog post for slow cooker instructions.


")
