


Is there anything more quintessentially autumn than the aroma of pumpkin and warm spices wafting from the oven? I think not. And while I adore a good slice of pumpkin bread or a batch of chewy pumpkin cookies, there’s something undeniably special about a perfectly baked scone. These Classic Pumpkin Scones are everything you want in a fall breakfast: buttery, flaky, and scented with cinnamon and pumpkin pie spice, all crowned with a decadent maple glaze that will make you swoon.
I’ll let you in on a little secret: I used to be intimidated by scones. I’d heard horror stories of dry, dense hockey pucks that required a vat of coffee just to swallow. But the truth is, making bakery quality scones at home is completely achievable once you understand a few simple tricks. This recipe, inspired by the baking genius Sally McKenney, is my go to because it’s reliable, straightforward, and yields that irresistible contrast of a crisp, sugary top and a tender, flaky center every single time.
The Secrets to Scone Success
Before we dive into the recipe, let’s talk about the non negotiables. These aren’t complicated steps, but they are the difference between a good scone and a great scone.
- Frozen Butter is Your Best Friend: Do not skip this. I grate a stick of frozen butter using a standard box grater. Those tiny frozen shreds get distributed throughout the flour, and as they melt in the hot oven, they release steam. That steam creates the flaky, tender pockets we all crave. Butter that’s just cold from the fridge can soften too quickly while you’re working the dough.
- Blot That Pumpkin: Canned pumpkin puree holds a lot of moisture. If you dump it straight in, your scones will lean toward a muffin like or cakey texture. To achieve that classic crumbly scone texture, measure your pumpkin, then press it gently between layers of paper towels or a clean kitchen towel for about 15 seconds. You’ll be amazed how much liquid comes out.
- Handle with Care: Scone dough is a lot like pie crust or biscuit dough; it likes to be left alone. Mix just until the wet and dry ingredients come together. Overworking the gluten will result in a tough, chewy scone instead of a light, flaky one.
Ingredient Spotlight
- Pumpkin Pie Spice: The recipe calls for 1.5 teaspoons. If you don’t have a jar of it in your pantry (it’s worth grabbing during fall!), you can easily make your own blend. For this recipe, just combine 1/2 teaspoon each of ground allspice and ground ginger, plus 1/4 teaspoon each of ground nutmeg and ground cloves. And remember, that’s in addition to the separate teaspoon of cinnamon already in the recipe.
- Heavy Cream: This is non negotiable for texture. The high fat content in heavy cream contributes to the tender crumb and rich flavor. It also gives the tops that beautiful golden sheen when brushed on right before baking. While some bakers swear by buttermilk, heavy cream is the secret weapon here for a truly luxurious scone.
Step by Step: Your Path to Pumpkin Perfection
The process is simple: whisk the dry ingredients, cut in the frozen butter, whisk the wet ingredients, and gently bring it all together.
Forming the Dough: After drizzling the wet mixture over the dry, use a spatula to fold everything together until it’s just moistened. The dough will look shaggy. Flour your hands well and gently press and fold the dough in the bowl until it comes together in a cohesive ball. Turn it out onto a lightly floured surface and press it into an 8 inch disc. Use a sharp bench scraper or chef’s knife to cut it cleanly into 8 wedges—a swift, downward cut ensures the edges stay flaky rather than getting squished.
The Glaze: While the scones bake, whisk the maple syrup and butter together in a small saucepan over low heat just until melted. Remove from the heat and whisk in sifted powdered sugar until smooth. Drizzle this liquid gold over the scones while they’re still warm so it cascades into every nook and cranny.
Serving & Storing
These scones are, without a doubt, best enjoyed warm from the oven with a hot cup of coffee or a pumpkin spice latte. If you have leftovers, they’ll keep at room temperature for a day or two, but the texture is best revived with a quick 10 second zap in the microwave or a few minutes in a warm oven.
Ready to fill your kitchen with the scent of fall? Grab your grater and let’s bake!
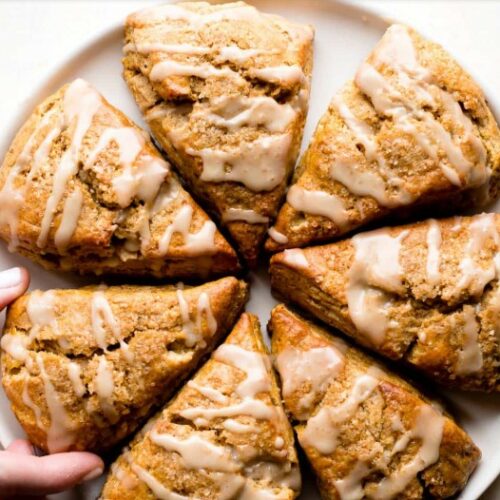
Classic Pumpkin Scones with Maple Glaze
Ingredients
Scones
- 2 cups 250g all purpose flour (spooned & leveled)
- 2 ½ teaspoons baking powder
- 1 teaspoon ground cinnamon
- 1 ½ teaspoons pumpkin pie spice
- ½ teaspoon salt
- ½ cup 8 Tbsp; 113g unsalted butter, frozen
- ⅓ cup + 2 Tablespoons 105ml heavy cream, divided
- 1 large egg
- ½ cup 115g canned pumpkin puree, blotted
- ½ cup 100g light brown sugar, packed
- 1 teaspoon pure vanilla extract
- Optional: coarse sugar for sprinkling
Maple Glaze
- 2 Tablespoons 28g unsalted butter
- ⅓ cup 80ml pure maple syrup
- 1 cup 112g confectioners' sugar, sifted
- Pinch of salt to taste
Instructions
- Preheat oven to 400°F (204°C). Position oven rack to the middle low position. Line a large baking sheet with parchment paper or a silicone baking mat. Set aside.
- Make the Scone Dough: In a large mixing bowl, whisk together the flour, baking powder, cinnamon, pumpkin pie spice, and salt.
- Grate the frozen butter using the large holes of a box grater. Add the grated butter shreds to the flour mixture. Use a pastry cutter or your fingertips to gently toss and combine until the mixture resembles coarse, pea sized crumbs. Place the bowl in the refrigerator while you mix the wet ingredients.
- In a separate small bowl or liquid measuring cup, whisk together ⅓ cup (75ml) of the heavy cream, the egg, blotted pumpkin puree, brown sugar, and vanilla extract until smooth.
- Pour the wet ingredients over the chilled flour butter mixture. Fold together gently with a rubber spatula just until the dough appears moistened and begins to come together. Do not overmix.
- With floured hands, gently work the dough into a ball inside the bowl. Transfer the dough to a lightly floured work surface. Press the dough into an even 8-inch disc. Using a very sharp knife or bench scraper, cut the disc into 8 equal wedges.
- Arrange the scone wedges at least 2 inches apart on the prepared baking sheet.
- Brush the tops of the scones evenly with the remaining 2 Tablespoons of heavy cream. Sprinkle generously with coarse sugar, if desired.
- Bake for 20 to 25 minutes, or until the scones are lightly golden brown on top and around the edges.
- Remove from the oven and allow scones to cool on the baking sheet for 5 minutes while you prepare the glaze.
- Make the Glaze: In a small saucepan over low heat, combine the butter and maple syrup. Warm gently, whisking occasionally, just until the butter is completely melted. Remove the pan from the heat immediately. Whisk in the sifted confectioners' sugar until the glaze is completely smooth. Taste and add a small pinch of salt if desired.
- Drizzle the warm maple glaze generously over the slightly cooled scones. Serve immediately.
Notes
- Blotting Pumpkin: Measure ½ cup pumpkin puree, then press gently between layers of paper towels or a clean kitchen towel to remove excess moisture. This step is crucial for achieving a flaky, crumbly scone texture rather than a muffin like texture.
- Frozen Butter: Do not thaw the butter. Grating it frozen ensures small, even pieces that create steam pockets for a flaky rise.
- Storage: Scones are best enjoyed the day they are made. Store leftovers covered at room temperature for up to 2 days. Reheat briefly in the microwave or toaster oven to refresh.
- Freezing: Unbaked scone wedges can be frozen on a sheet pan until solid, then transferred to a freezer bag. Bake from frozen, adding a few extra minutes to the bake time.


