")
")
")
")
")


There are some flavor combinations that are simply destined to be together. Peanut butter and jelly. Cookies and cream. And at the very top of that list, reigning supreme in the dessert world, is the one and only chocolate and peanut butter.
I’ve been in love with this dynamic duo for as long as I can remember. From the classic peanut butter cup to a heaping spoonful of peanut butter swirled into chocolate ice cream, it’s a match made in heaven. These Chocolate Peanut Butter Brownie Bites were born from that very obsession. I wanted to create a dessert that captured everything I adore about this pairing: a rich, fudgy, intensely chocolatey base, and a luscious, creamy peanut butter center. The first time I made them, they disappeared from the kitchen counter in minutes. My family couldn’t stop reaching for “just one more.”
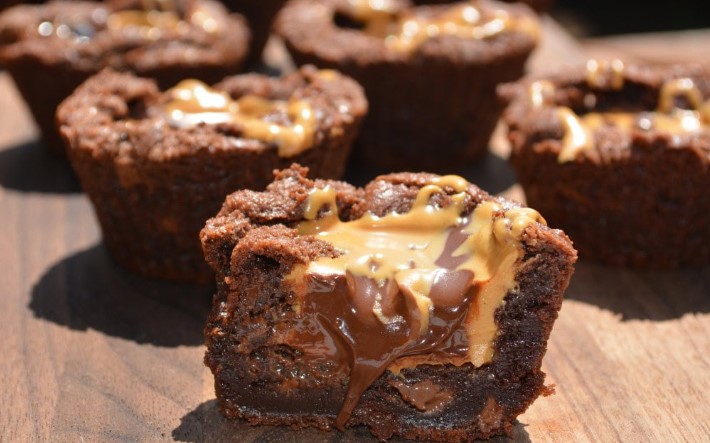
Imagine this: a perfectly portioned, fudgy brownie bite with a slightly crisp top and an incredibly moist, dense interior. Hidden within is a pocket of warm, melted, creamy peanut butter that oozes out with every single bite. Studded throughout are extra milk chocolate chips for even more chocolatey goodness. They’re rich, decadent, and utterly irresistible; a tiny taste of heaven that’s surprisingly easy to make. Let me show you how to create your new favorite sweet treat.
Ingredient Spotlight: The Building Blocks of Bliss
- Semi Sweet Chocolate Chips: Melted into the batter, these provide the deep, rich chocolate foundation that makes these brownie bites so fudgy.
- Milk Chocolate Chips: Folded in at the end, they create delightful pockets of creamy, melted chocolate throughout each bite.
- Creamy Peanut Butter: The star of the show! A spoonful of warmed, melty peanut butter is poured right into the center, creating that iconic, gooey filling.
- Butter & Sugar: The classic base for a chewy, fudgy brownie. Make sure your butter is softened for easy mixing.
- Egg & Vanilla: The egg provides structure and moisture, while vanilla extract enhances all the wonderful flavors.
- Flour & Baking Soda: Just a touch of flour gives the brownies body, and a little baking soda helps them rise just enough.
Step by Step Instructions: Your Guide to Brownie Bite Perfection
This recipe comes together quickly in just one bowl for the brownie batter!
1Preheat and Prep: Preheat your oven to 350°F (175°C). Line a standard 12 cup muffin tin with paper liners or generously grease each cup with non stick spray.
2Melt the Base: In a large, microwave safe bowl, combine the ¾ cup of sugar, ¼ cup of softened butter, and 1 tablespoon of water. Microwave in 45 second increments, stirring between each, until the butter is completely melted and the mixture is smooth.
3Add the Chocolate: Add 1 cup of semi sweet chocolate chips to the warm butter mixture. Stir continuously until the chips are completely melted and the mixture is smooth and glossy. If they aren’t melting fully, return the bowl to the microwave for another 15-20 seconds.
4Incorporate Wet Ingredients: Let the mixture cool for just a minute, then stir in the 1 egg and ½ teaspoon of vanilla extract until well combined.
5Add Dry Ingredients: Sprinkle the 1 cup of all purpose flour and ¼ teaspoon of baking soda over the wet mixture. Stir gently until just combined. Be careful not to overmix, as this can make the brownies tough instead of fudgy.
6Cool the Batter: Allow the batter to cool for about 5-10 minutes. This is an important step so you don’t melt the next addition of chocolate chips!
7Fold in Chocolate Chips: Gently fold in the ¾ cup of milk chocolate chips, distributing them evenly throughout the batter.
8Fill the Muffin Tin: Spoon the batter into the prepared muffin cups, filling each about ¾ full. This recipe should make about 12 brownie bites.
9Bake to Perfection: Bake in the preheated oven for 14-16 minutes. The tops should look set and might be slightly cracked. A toothpick inserted into the brownie part (not the very center) should come out with a few moist crumbs.
10Create the Well: Remove the pan from the oven and let it cool on a wire rack for about 5 minutes. If the centers haven’t naturally sunk a little, use the back of a teaspoon or a tablespoon to gently press down into the middle of each brownie bite, creating a small divot or well.
11Add the Peanut Butter: Place the ½ cup of creamy peanut butter in a small, microwave safe bowl. Microwave for 20-30 seconds, until it is warm, creamy, and pourable. Spoon about 1 tablespoon of the melted peanut butter into the well of each brownie bite.
12Garnish and Enjoy: For an extra touch, you can top the peanut butter with a few additional milk chocolate chips while it’s still warm. Let the brownie bites cool completely in the pan before removing and serving.
Expert Tips for Brownie Bite Success
- The Secret to Fudgy Brownies: Do not overmix the batter once the flour is added! Mix just until the last streaks of flour disappear. Overmixing develops the gluten, leading to a more cake like texture.
- Cool the Batter: Allowing the batter to cool for 5-10 minutes before folding in the milk chocolate chips prevents them from melting completely into the batter. You want distinct pockets of chocolate chips for the best texture.
- Perfect Wells: If the centers of your brownie bites don’t sink on their own while cooling, simply use the back of a spoon to gently press them down while they are still warm. This creates the perfect little cup for the peanut butter filling.
- Room Temperature Ingredients: Using a room temperature egg (and softened butter) helps the batter come together smoothly and emulsify properly, resulting in a better texture.
Recipe FAQ: Your Questions Answered
Can I use a different type of chocolate?
Absolutely! Feel free to use all semi sweet, all milk chocolate, or even dark chocolate chips based on your preference. You can also use chocolate chunks for a different texture.
I only have crunchy peanut butter. Will that work?
You can use crunchy peanut butter, but the texture of the filling will be different, with little bits of peanut. For the classic smooth, creamy center, stick with creamy peanut butter. Natural peanut butter (the kind that needs stirring) can sometimes separate when melted, so a standard commercial creamy peanut butter works best here.
Can I make these in a mini muffin tin?
Yes, you can! This is a great option for even more bite sized treats. Grease or line your mini muffin tin. Fill the cups about ¾ full and reduce the baking time. Start checking at 8-10 minutes. The yield will be higher, likely around 24-36 mini bites.
How do I know when the brownie bites are done baking?
The tops should look set, shiny, and might have a few small cracks. Because these are meant to be fudgy, a toothpick inserted into the center (into the brownie, not the very middle where the peanut butter will go) should come out with a few moist, fudgy crumbs attached, not wet batter.
Can I make these gluten free?
Yes, with a simple swap. You can substitute the all purpose flour with a good quality 1:1 gluten free baking flour blend (like one from Bob’s Red Mill or King Arthur). Make sure your blend contains xanthan gum for the best texture.
Make Ahead, Storage & Freezing Instructions
- Make Ahead: You can prepare the brownie bites (through baking and filling) up to 2 days in advance. Store them in an airtight container at room temperature.
- Storage: Store any leftover brownie bites in an airtight container at room temperature for up to 3 days, or in the refrigerator for up to 5 days. If refrigerated, let them sit at room temperature for about 20-30 minutes before serving to allow the brownie to soften and the peanut butter to become creamy again.
- Freezing Instructions: These brownie bites freeze beautifully! Allow them to cool completely. Place them in a single layer in a freezer safe container or bag, separating layers with parchment paper to prevent sticking. Freeze for up to 3 months. To enjoy, thaw at room temperature for about an hour or in the refrigerator overnight.
Serving Suggestions: The Perfect Pairings
- As a Dessert Platter: Arrange these brownie bites on a beautiful platter with other small treats like chocolate dipped strawberries, mini cheesecakes, or truffles for an impressive dessert spread.
- A La Mode Mode: Serve a warm brownie bite (you can gently reheat it for a few seconds) with a small scoop of vanilla bean ice cream or a dollop of lightly sweetened whipped cream. The combination of warm and cold is divine.
- With a Cold Glass of Milk: You can’t beat the classic pairing! A tall, cold glass of milk is the perfect companion to cut through the richness of these decadent bites.
- Drink Pairing: A rich, dark beer like a Stout or a Porter complements the chocolate and peanut butter flavors wonderfully. For wine lovers, a Ruby Port or a glass of Banyuls is a classic dessert pairing. A warm mug of coffee or a café au lait is also a fantastic choice.
Chocolate Peanut Butter Brownie Bites
Equipment
- Standard 12 cup muffin tin
- Paper muffin liners or non stick cooking spray
- Large microwave safe mixing bowl
- Small microwave safe bowl (for peanut butter)
- Whisk and spatula
- Measuring cups and spoons
- Wire cooling rack
- Tablespoon measure (for making wells)
Ingredients
- ¾ cup granulated sugar
- ¼ cup unsalted butter softened
- 1 tablespoon water
- 1 cup semi sweet chocolate chips
- 1 large egg
- ½ teaspoon vanilla extract
- 1 cup all purpose flour
- ¼ teaspoon baking soda
- ¾ cup milk chocolate chips
- ½ cup creamy peanut butter not natural style
Instructions
- Preheat and Prep: Preheat your oven to 350°F (175°C). Line a 12 cup muffin tin with paper liners or grease generously with non stick spray. Set aside.
- Melt Base: In a large microwave safe bowl, combine the sugar, softened butter, and water. Microwave in 45 second increments, stirring well after each, until the butter is completely melted and the mixture is smooth.
- Add Semi Sweet Chips: Add the 1 cup of semi sweet chocolate chips to the warm butter mixture. Stir continuously until the chips are fully melted and the mixture is smooth and glossy. If needed, return to the microwave for another 15-20 seconds to finish melting.
- Add Wet Ingredients: Let the mixture cool for a minute, then stir in the egg and vanilla extract until well combined.
- Add Dry Ingredients: Sprinkle the flour and baking soda over the wet mixture. Stir gently with a spatula until just combined. Be careful not to overmix.
- Cool Batter: Allow the batter to cool for 5-10 minutes. This prevents the next addition of chocolate chips from melting completely.
- Fold in Milk Chocolate Chips: Gently fold the ¾ cup of milk chocolate chips into the cooled batter until evenly distributed.
- Fill Muffin Tin: Divide the batter evenly among the 12 prepared muffin cups, filling each about ¾ full.
- Bake: Bake for 14-16 minutes, or until the tops are set and a toothpick inserted into the brownie part (not the center) comes out with a few moist crumbs.
- Create Wells: Remove the pan from the oven and let it cool on a wire rack for 5 minutes. If the centers haven't naturally sunk, use the back of a teaspoon to gently press down into the middle of each brownie bite, creating a small well.
- Add Peanut Butter: Place the ½ cup of creamy peanut butter in a small microwave safe bowl. Microwave for 20-30 seconds until warm, creamy, and pourable. Spoon about 1 tablespoon of the melted peanut butter into the well of each brownie bite.
- Garnish and Cool: If desired, top the peanut butter with a few extra milk chocolate chips. Allow the brownie bites to cool completely in the pan before removing and serving.
Notes
- For Fudgy Brownies: Do not overmix the batter once the flour is added. Mix until just combined for the best fudgy texture.
- Storage: Store in an airtight container at room temperature for up to 3 days or in the refrigerator for up to 5 days. If refrigerated, let sit at room temperature for 20 minutes before serving.
- Freezing: Freeze cooled, unfilled brownie bites in a freezer safe container for up to 3 months. Thaw, then warm slightly before creating wells and adding fresh melted peanut butter. You can also freeze the completed bites; thaw at room temperature.
- Gluten Free Option: Substitute the all purpose flour with a 1:1 gluten free baking flour blend.
- Peanut Butter Note: Standard commercial creamy peanut butter (like Jif or Skippy) works best for a smooth, stable filling. Natural peanut butter can separate when melted.
")


