
")

")


Some desserts just feel like a warm hug in a bowl, and this Vegan Chocolate Pudding is exactly that. It’s the kind of treat that transports you straight back to childhood; remember those little snack pack puddings? but elevated into something infinitely richer, silkier, and made entirely from scratch with wholesome plant based ingredients. No powdered mixes, no dairy, no refined junk. Just pure, velvety chocolate bliss.
I’ve made this pudding more times than I can count, and every single time, I’m amazed at how something so incredibly decadent can come together in a single saucepan in under 10 minutes. We’re talking about a dessert that’s fancy enough for a dinner party yet simple enough to whip up on a random Tuesday night when a chocolate craving strikes. It’s proof that vegan desserts don’t need a laundry list of fancy ingredients to be absolutely spectacular.
The magic lies in a handful of pantry staples: your favorite dairy free milk, unsweetened cocoa powder, a touch of cornstarch for that perfect pudding texture, and a sneaky spoonful of peanut butter that adds depth and richness you won’t quite be able to put your finger on. Let’s make some pudding magic together.
Why You’ll Love This Recipe
- Incredibly Quick: The hands on time is just 10 minutes. Seriously. The hardest part is waiting for it to chill.
- Luxuriously Creamy: Thanks to the perfect ratio of cornstarch to dairy free milk, this pudding sets up with a silky, spoonable texture that’s absolutely dreamy.
- Deep Chocolate Flavor: Using both cocoa powder and melted dairy free chocolate creates an intense, complex chocolate experience that rivals any traditional version.
- Pantry Friendly: No eggs, no cream, no specialty vegan products. Everything you need is likely already sitting in your kitchen.
- Make Ahead Perfection: This pudding is ideal for meal prep. Make a batch on Sunday, and you have grab and go desserts all week long.
The Secret to Silky Smooth Vegan Pudding
I’ve tested this recipe countless times, and I have a few non negotiable tips for pudding perfection. First and foremost: whisk your cornstarch into cold milk completely before you even think about turning on the heat. This is the golden rule for a lump free pudding. Cornstarch dissolves smoothly in cold liquid, but if you add it to something warm, it will seize up into stubborn little clumps.
Second, patience during the cooking process pays off. You’ll whisk the mixture over medium heat until it comes to a gentle boil, then keep whisking for another 30 to 60 seconds. You’ll actually see the pudding transform before your eyes, thickening from a thin liquid into a glossy, velvety masterpiece. It’s a little bit of kitchen alchemy that never gets old.
Finally, don’t skip the peanut butter. I know it might sound like an odd addition to chocolate pudding, but trust me on this one. A couple of tablespoons of creamy peanut butter melt seamlessly into the warm pudding, adding a subtle nutty richness that makes the chocolate flavor taste even more intense without screaming “peanut butter.” That said, you can absolutely use almond butter, sunflower seed butter, or simply leave it out if you prefer.
How to Serve This Vegan Chocolate Pudding
Once you’ve poured the warm pudding into individual jars or ramekins, the hardest part begins: the waiting. It needs a couple of hours in the refrigerator to fully set into that perfectly scoopable, mousse like texture. To prevent an unappetizing skin from forming on top, press a piece of plastic wrap directly onto the surface of each pudding before chilling.
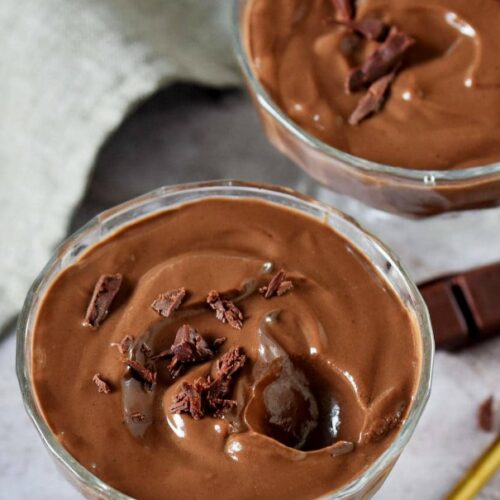
When you’re ready to serve, the topping possibilities are endless. I love a generous dollop of coconut whipped cream and a scattering of fresh raspberries for a pop of color and tartness. Chocolate shavings, a sprinkle of flaky sea salt, crushed toasted hazelnuts, or a drizzle of almond butter all take this humble pudding into seriously impressive territory. For a truly indulgent experience, layer it with crumbled cookies and dairy free whipped cream for an easy vegan parfait.
Frequently Asked Questions
What’s the best dairy free milk to use?
I’ve tested this recipe with nearly every plant based milk on the market. Full fat canned coconut milk creates the richest, most decadent pudding, while homemade cashew milk yields a beautifully neutral, creamy result. Almond milk works wonderfully for a lighter version. I recommend avoiding rice milk, as it’s quite thin and may not set up as firmly.
Can I use a different sweetener?
Absolutely. Coconut sugar adds a lovely caramel note, but granulated sugar, brown sugar, maple syrup, or agave nectar all work beautifully. If using a liquid sweetener, you might need to increase the cornstarch ever so slightly, though I’ve found the recipe works well as written in most cases.
What if my pudding turns out lumpy?
Don’t panic! Even the most careful whisking can sometimes leave a few lumps. Simply pour the finished pudding through a fine mesh strainer, or use an immersion blender to whiz it into silky submission right in the saucepan. Problem solved.
Why shouldn’t I use tapioca flour?
Tapioca flour (or tapioca starch) creates a texture that’s more stretchy and “gloopy” rather than creamy and spoonable. Arrowroot flour is a great cornstarch substitute, but stick with cornstarch for the absolute best classic pudding texture.
How should I store leftovers?
Store leftover pudding in an airtight container in the refrigerator for up to 3 days. I like to portion it into small jars with lids for easy grab and go treats. The pudding will continue to thicken slightly as it sits, which only makes it more delicious.
The Best Vegan Chocolate Pudding
Ingredients
- 2 cups dairy free milk coconut, cashew, or almond milk recommended
- 3 1/2 tablespoons cornstarch or arrowroot flour
- 1/4 cup coconut sugar or granulated sugar of choice
- 4 tablespoons unsweetened cocoa powder
- 1 pinch of salt
- 1 teaspoon vanilla extract
- 2 tablespoons peanut butter or any nut/seed butter
- 1.75 ounces dairy free chocolate chopped (optional but recommended)
Instructions
- In a medium sized saucepan, combine the dairy free milk, cornstarch, sugar, cocoa powder, and salt. Whisk vigorously until the cornstarch dissolves completely and no lumps remain. This step must be done while the liquid is still cold to prevent lumps.
- Place the saucepan over medium heat. Bring the mixture to a boil, whisking frequently to prevent sticking.
- Once the pudding starts boiling, reduce the heat to low. Whisk continuously for about 30 to 60 seconds. You will notice the pudding thicken and become glossy.
- Remove the saucepan from the heat. Add the vanilla extract, peanut butter, and chopped dairy free chocolate (if using). Whisk until the peanut butter and chocolate are completely melted and the pudding is perfectly smooth.
- Pour the pudding into individual serving jars or ramekins. To prevent a skin from forming, press a piece of plastic wrap directly onto the surface of each pudding. Refrigerate for at least 2 hours, or until fully set and chilled. Enjoy!
Notes
The peanut butter adds a subtle richness that enhances the chocolate flavor. Feel free to substitute almond butter, sunflower seed butter, or omit entirely.
Adding chopped dairy free chocolate makes the pudding thicker and gives it a more intense chocolate flavor. It is optional but highly recommended.
Do not substitute tapioca flour for the cornstarch, as it will create a stretchy, "gloopy" texture rather than a creamy one.
If any lumps form despite whisking, simply use an immersion blender directly in the saucepan for a perfectly smooth result.
Store leftovers covered in the refrigerator for up to 3 days. The total time listed does not include chilling.

")


")

