
")

")


Let’s talk about one of my family’s most beloved traditions: hibachi night. You know the experience; sitting around a sizzling grill, watching a talented chef flip shrimp tails into their hat, creating onion volcanoes, and serving up the most impossibly flavorful chicken and vegetables. It’s entertainment and dinner all in one. But let’s be honest, it’s not exactly a budget friendly weekly habit. That’s where this Instant Pot Hibachi Chicken comes in. I set out to capture all that savory, buttery, umami rich magic of hibachi style chicken and make it achievable on a busy Tuesday night. After many tests, this recipe was born. It delivers that same crave worthy flavor; tender chicken, perfectly cooked vegetables, and that signature savory sweet sauce; all made in your Instant Pot in under 30 minutes. No teppanyaki grill required.
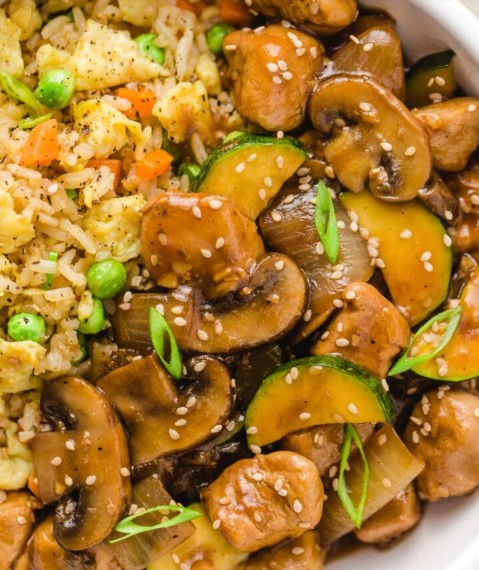
Let’s dive into what makes this dish so irresistible. The flavor is pure umami bliss. The sauce is a perfect balance of salty soy sauce, aromatic ginger and garlic, a touch of sweetness from honey or sugar, and a hint of acidity from vinegar. It coats every piece of chicken and vegetable in a glossy, flavorful glaze. The texture is just right: the chicken comes out incredibly tender and juicy from the pressure cooking, while the vegetables retain a satisfying tender crisp bite (especially if you follow my tip for adding them after pressure cooking). Served over a bed of fluffy rice and garnished with sesame seeds and green onions, it’s a bowl of pure comfort that rivals any restaurant hibachi chicken.
Secrets to Instant Pot Hibachi Success
These pro tips are your guarantee for perfect, restaurant quality results every single time.
- Use Low Sodium Soy Sauce: This is crucial. Regular soy sauce will make your dish overwhelmingly salty. Low sodium soy sauce allows you to control the saltiness and lets the other flavors; ginger, garlic, vinegar; shine through.
- Don’t Overcook the Chicken: 3 minutes at high pressure is the sweet spot for bite sized chicken breasts. It’s enough time to cook them through perfectly while keeping them incredibly tender and juicy. Remember, the pot takes time to come to pressure, which also gently cooks the food.
- Quick Release is Essential: As soon as the cooking program ends, perform a quick release of the pressure. This stops the cooking process immediately and prevents the chicken from overcooking and becoming tough.
- For Perfectly Textured Veggies, Read the Note: The recipe gives you two options. If you love very tender, almost melt in your mouth veggies, cook them with the chicken. But for that classic hibachi style tender crisp texture, I highly recommend steaming the zucchini separately after pressure cooking (see the notes section). It makes all the difference!
Make Ahead, Storage & Freezing Instructions
This dish is a meal prep superstar, allowing you to enjoy hibachi flavors all week long.
- Make Ahead Components: You can prep all your ingredients in advance!
-
- Chicken: Cut the chicken into bite sized pieces up to 24 hours ahead and store in the fridge.
- Vegetables: Slice the zucchini, onion, and mushrooms up to 2 days ahead and store in separate containers.
- Sauce: Whisk together all the sauce ingredients (except the cornstarch slurry) and store in a jar in the fridge for up to 3 days.
- Storing Leftovers: Store any leftover chicken and vegetables in an airtight container in the refrigerator for 3-4 days. Store separately from rice.
- Reheating: Reheat gently in a skillet over medium heat with a tiny splash of water or soy sauce to refresh the sauce. You can also reheat in the microwave, but the vegetables may be softer.
- Freezing Instructions: This dish freezes well! Place the cooled chicken and vegetables (without rice) in a freezer safe container or bag. Freeze for up to 3 months. Thaw overnight in the refrigerator and reheat in a skillet.
Step by Step Instructions
Prep Time: 15 minutes | Cook Time: 3 minutes (plus time to come to pressure) | Total Time: ~30 minutes
Follow these simple steps for perfect Instant Pot hibachi chicken.
1Make the Sauce: In your Instant Pot insert, combine the low sodium soy sauce, water, vinegar, grated ginger, minced garlic, and sugar (or honey/maple syrup). Add the ground white or black pepper.
2Add Chicken and (Some) Veggies: Add the bite sized chicken pieces, onion, and mushrooms to the pot. (If you prefer your zucchini very tender, add it now as well. If you like it firmer, see the notes section for the alternative method.)
3Pressure Cook: Secure the lid on the Instant Pot and set the valve to the SEALING position. Select the PRESSURE COOK (or MANUAL) setting and set the time for 3 minutes at high pressure. The pot will take about 7-10 minutes to come to pressure before it starts counting down.
4Quick Release: When the cooking program ends, immediately perform a quick release by carefully turning the valve to VENTING. Wait for the pin to drop, then carefully remove the lid.
5Remove Chicken and Veggies (Optional): For the best texture, use a slotted spoon to transfer the chicken, onion, and mushrooms to a plate, leaving the sauce in the pot. This prevents them from overcooking while you thicken the sauce.
6Thicken the Sauce: Press the SAUTÉ button. In a small bowl, whisk together the cornstarch and water to create a slurry. Once the sauce in the pot comes to a gentle simmer, slowly whisk in the cornstarch slurry. Continue whisking for 1-2 minutes until the sauce thickens to a glossy, gravy like consistency. (It thickens very quickly!)
7Combine (and Add Zucchini if Steaming): If you’re using the firmer zucchini method, add the raw zucchini slices to the pot now, stir to coat in the hot sauce, cover with the lid (with the pot off), and let it steam for 3-5 minutes until tender crisp. Then, return the chicken, onion, and mushrooms to the pot and stir everything together to coat in the sauce.
8Serve: Serve immediately over steamed rice, garnished with chopped green onions and toasted sesame seeds.
Customize It: Ingredient Substitutions
This recipe is wonderfully adaptable to different tastes and dietary needs.
- Gluten Free: Use gluten free tamari or coconut aminos in place of the soy sauce. Ensure your other ingredients are certified gluten free.
- Vegan: Substitute the chicken with extra firm tofu (pressed, cubed, and added raw) or king oyster mushrooms (sliced thickly). Use maple syrup instead of honey.
- Low Carb/Keto: Serve over cauliflower rice instead of regular rice. Use a sugar free sweetener like monk fruit or erythritol in place of the sugar/honey.
- Common Pantry Swaps:
- Protein: Boneless, skinless chicken thighs work beautifully and are even more forgiving. You can also use shrimp (reduce pressure cook time to 1 minute, or cook separately and add at the end).
- Vegetables: This is a great clean out the fridge dish! Try adding broccoli florets, snap peas, bell peppers, or carrots (thinly sliced). Adjust cooking method accordingly.
- Vinegar: Rice vinegar, apple cider vinegar, or white wine vinegar all work well.
- Sweetener: Honey, maple syrup, or granulated sugar are all great options. Use your favorite.
Serving Suggestions: How to Enjoy Your Hibachi Bowl
This dish is a complete meal in a bowl, but here are a few ways to make it even more special.
- The Classic Pairing: Serve it over a bed of steamed jasmine or white rice with a side of hibachi style fried rice for the full experience.
- Add a Veggie Side: A simple steamed or stir fried broccoli or a cucumber salad with rice vinegar and sesame oil are perfect complements.
- Beverage Pairings: The savory, umami flavors pair wonderfully with a crisp, cold Japanese lager like Sapporo or Asahi. For a non alcoholic option, iced green tea or sparkling water with a twist of lime is refreshing.
- Sauces on the Side: Serve with extra soy sauce, a drizzle of spicy mayo (mix mayo with sriracha), or a dollop of yum yum sauce for dipping.
Essential Equipment List
- 6 Quart Instant Pot (or any electric pressure cooker): The star of the show! This recipe is designed for a standard 6 quart model.
- Cutting Board and Sharp Chef’s Knife: For prepping the chicken and vegetables.
- Small Bowl: For making the cornstarch slurry.
- Measuring Cups and Spoons
- Slotted Spoon: Useful for removing the chicken and veggies from the pot before thickening the sauce.
- Whisk: For smoothly incorporating the cornstarch slurry into the sauce.
Frequently Asked Questions (FAQ)
- Can I use chicken thighs instead of breasts?
Absolutely! Boneless, skinless chicken thighs are even more forgiving and will stay incredibly juicy. Cut them into bite sized pieces and cook for the same 3 minutes. - My sauce isn’t thickening. What should I do?
Make sure your sauce is at a gentle simmer before adding the cornstarch slurry. Also, ensure you’re whisking constantly as you add it. If it’s still not thick enough after a minute, you can mix another teaspoon of cornstarch with a tablespoon of water and add it, whisking until it thickens. - Can I double this recipe?
Yes, you can! Just ensure all the ingredients fit comfortably in your Instant Pot without going over the max fill line. The cooking time should remain the same. - What if I don’t have an Instant Pot? Can I make this on the stovetop?
Definitely! This would be delicious as a quick stir fry. Cook the chicken in a large skillet or wok over high heat until golden and cooked through. Remove, cook the vegetables until tender crisp, then add the sauce mixture (with cornstarch already dissolved in it) and simmer until thickened. Toss the chicken back in and serve.
Instant Pot Hibachi Chicken
Ingredients
For the Sauce:
- ¼ cup low sodium soy sauce
- ¼ cup water
- 2 tablespoons rice vinegar or apple cider vinegar
- 1 tablespoon fresh ginger grated
- 2 cloves garlic minced
- 1 tablespoon granulated sugar honey, or maple syrup
- ¼ teaspoon ground white pepper or black pepper
For the Chicken and Vegetables:
- 1½ pounds boneless skinless chicken breasts, cut into bite sized pieces
- 2 medium zucchini sliced into ¼ inch rounds, then halved
- 1 medium yellow onion sliced or quartered
- 6 ounces cremini mushrooms sliced ¼ inch thick
For Thickening:
- 1½ tablespoons cornstarch mixed with 2 tablespoons cold water slurry
For Serving:
- Cooked white or brown rice
- Green onions chopped
- Toasted sesame seeds
Instructions
- Combine Sauce in Pot: In the Instant Pot insert, whisk together soy sauce, water, vinegar, ginger, garlic, and sugar. Add white pepper.
- Add Chicken and Veggies: Add the chicken, onion, and mushrooms to the pot. (If you prefer very tender zucchini, add it now. For firmer zucchini, see notes.)
- Pressure Cook: Secure the lid, set valve to SEALING. Pressure Cook on HIGH for 3 minutes. The pot will take 7-10 minutes to come to pressure.
- Quick Release: When the program ends, immediately perform a quick release of the steam. Carefully remove the lid.
- Thicken Sauce (Optional Step for Best Texture): Use a slotted spoon to transfer chicken and vegetables to a plate. Press SAUTÉ. When sauce simmers, slowly whisk in the cornstarch slurry. Cook for 1-2 minutes until thickened.
- Add Zucchini (if using firmer method): Add raw zucchini to the thickened sauce, stir to coat, cover (with pot off), and let steam for 3-5 minutes until tender crisp. Return chicken and other vegetables to the pot and stir to combine.
- Serve: Serve hot over rice, garnished with green onions and sesame seeds.
Notes
- Low Sodium Soy Sauce is Key: Regular soy sauce will make the dish too salty.
- Zucchini Texture: For tender crisp zucchini, add it after pressure cooking (Step 6). For very soft zucchini, add it with the chicken in Step 2.
- Storage: Store leftovers in an airtight container in the fridge for 3-4 days. Freezes well for up to 3 months.


")


