


Let’s be honest: the quest for the perfect homemade brownie is a deeply personal one. For years, I was on a mission, cycling through recipes that were either too cakey, too dry, or just… not quite it. That “it” factor? A dense, fudgy interior that melts on your tongue, a rich, deep chocolate flavor that doesn’t rely on fancy bars, and that elusive, mesmerizing shiny, crackly top that looks like it belongs in a bakery case. This recipe is the triumphant end to that search.
I developed this recipe by combining the best bits of classic technique with a few modern secrets. It’s inspired by the nostalgia of a perfect childhood treat, but engineered for the discerning adult baker. It uses simple cocoa powder for accessibility, but the method unlocks a flavor and texture so luxurious, you’ll never look at a boxed mix again. This is the brownie recipe I make for every potluck, birthday, and “I need chocolate NOW” emergency. It’s my most requested recipe for a reason.
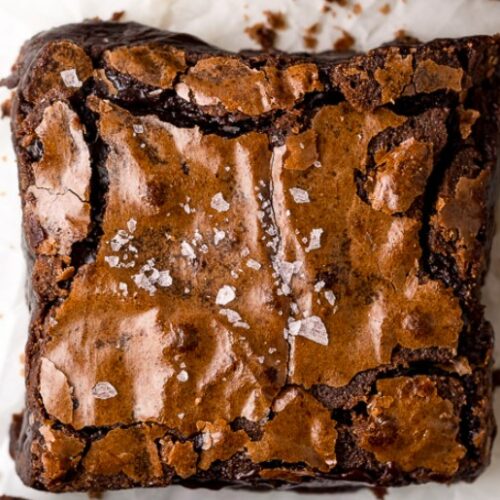
The flavor profile is pure, unadulterated chocolate bliss. These are intensely chocolatey, with a deep, almost bittersweet richness that’s perfectly balanced by the sweetness. The optional espresso powder doesn’t make them taste like coffee; instead, it acts as a flavor amplifier, making the chocolate taste even more chocolatey. In terms of texture, they are the ultimate fudgy and chewy brownie. The center is dense and moist, nearly gooey if you bake them just right, while the edges have a delightful, slightly firmer chew. And then there’s the crown jewel: that thin, shiny, paper like top that cracks beautifully under gentle pressure, a sure sign of brownie perfection.
Why This Recipe Is The Only Brownie Recipe You’ll Ever Need
This recipe is a masterclass in technique over complexity. You don’t need expensive chocolate or special equipment. The magic lies in how you combine common pantry staples. By melting the butter with sugar and carefully blending it with well whisked eggs, you create the chemical reaction necessary for that iconic crackly top. It’s a foolproof method that delivers professional results every single time.
Expert Tips & Tricks for Brownie Perfection
Success Tips: The Non Negotiable Secrets
- Whisk Those Eggs Vigorously: This is Secret #1 for the crackly top. When combining the eggs, egg yolk, and sugar, whisk for a full 30 seconds until the mixture is well blended, slightly thickened, and pale. This incorporates air, which is key.
- The “Hot into Cold” Tempering is Crucial: Secret #2! You must pour the warm butter mixture into the egg mixture very slowly, in a thin stream, while whisking constantly. This gently heats the eggs without cooking them, dissolving the sugar and creating the perfect emulsion for the shiny top. Rushing this step is the most common mistake.
- The “Just Combined” Rule: When adding the dry ingredients and chocolate chips, use a gentle folding motion with a spatula. Stop mixing the moment you no longer see dry streaks of flour. A few tiny lumps are okay. Overmixing develops gluten, which is the #1 reason homemade brownies turn out cakey and tough.
- Trust the Wiggle, Not Just the Timer: Ovens vary. Start checking at 27 minutes. The brownies are done when the edges look set and puffed, the top is shiny and cracked, and the center still has a slight jiggle when you gently shake the pan. A toothpick inserted about an inch from the edge should come out with moist crumbs, not wet batter.
Make Ahead & Storage
- Make Ahead: The batter can be made, poured into the lined pan, covered tightly with plastic wrap, and refrigerated for up to 24 hours before baking. Let it sit at room temperature for 20-30 minutes before baking as directed.
- Storage: Once completely cool, store brownies in an airtight container at room temperature for up to 3 days. For longer freshness, store them in the refrigerator for up to 5 days. The texture becomes even more deliciously fudgy when chilled.
- Reheating: For that “fresh from the oven” experience, warm a refrigerated or room temp brownie in the microwave for 10-15 seconds, or in a 300°F (150°C) oven for 5 minutes.
Freezing Instructions (Excellent for Meal Prep!)
Yes, these brownies freeze beautifully! Let them cool completely in the pan. You can freeze the whole slab or individual squares. Wrap tightly in plastic wrap, then place in a freezer safe zip top bag or airtight container, squeezing out all excess air. Label and freeze for up to 3 months. Thaw overnight in the refrigerator or at room temperature for a few hours.
Step by Step Instructions
1Prep and Combine Dry Ingredients
Preheat your oven to 350°F (175°C). Line a 9×9 inch metal baking pan with parchment paper, leaving an overhang on two sides for easy removal. Lightly spray with non stick spray. In a medium bowl, sift together the all purpose flour, baking powder, salt, unsweetened cocoa powder, and espresso powder (if using). Sifting ensures no lumps and a lighter, more uniform dry mix. Set this bowl aside.
2Create the Flavor Base (Butter Mixture)
In a medium saucepan, combine the unsalted butter, neutral oil (like canola or vegetable), and exactly 1/3 cup (about 65g) of the granulated sugar. Heat over medium heat, stirring frequently, until the butter is just completely melted. The mixture will look grainy. Remove it from the heat immediately. Do not let it simmer or boil.
3Build the Crackly Top Foundation (Egg Mixture)
In a large mixing bowl, combine the 2 large eggs, 1 large egg yolk, vanilla extract (if using), and the remaining 1 cup (about 200g) of granulated sugar. Using a whisk, beat this mixture energetically for a full 30 seconds. It will become pale yellow, slightly frothy, and well combined. This step is critical.
4The Magic Tempering Step
Now, with one hand whisking the egg mixture constantly, use your other hand to very slowly drizzle the warm butter mixture into the bowl. Add it in a thin, steady stream, whisking the entire time. This gradual addition tempers the eggs and creates a smooth, thick, glossy batter. Once fully combined, let the mixture sit for a minute.
5Gently Bring It All Together
Add the sifted dry ingredients and the chocolate chips to the wet batter. Using a flexible rubber spatula, gently fold the mixture together. Use broad, sweeping motions, scraping from the bottom of the bowl up and over. Stop folding the very instant you no longer see dry streaks of flour. A few flour specks are preferable to overmixing.
6Bake to Perfection
Scrape the thick, luxurious batter into your prepared pan. Smooth the top with your spatula. Bake in the center of your preheated oven for 28-30 minutes. Look for: shiny, cracked tops; firm edges; and a center that jiggles slightly when nudged. For ultra fudgy brownies, lean toward 27-28 minutes. For more structured, chewy brownies, aim for 30-32 minutes.
7The Crucial Cool Down
Place the pan on a wire cooling rack. This is non negotiable! You must let the brownies cool completely in the pan; this will take at least 2 hours. As they cool, they finish setting up, developing their perfect fudgy texture. Cutting into warm brownies will result in a gooey mess. For clean cuts, you can chill them in the pan for an hour after cooling.
Ingredient Substitutions & Dietary Swaps
Dietary Swaps
- Gluten Free: Substitute the all purpose flour with a 1:1 gluten free baking flour blend (like Bob’s Red Mill or King Arthur). Ensure your cocoa powder is certified glutenfree.
- Dairy Free: Use a high quality plant based butter stick (like Miyoko’s or Earth Balance) and ensure your chocolate chips are dairy free. The oil can remain as is.
- Vegan: This recipe is challenging to make vegan successfully due to the crucial role of eggs in structure and creating the crackly top. I do not recommend direct egg substitutes (like flax eggs) for this specific formula, as they will not yield the same result.
Common Ingredient Substitutes
- Cocoa Powder: You can use natural unsweetened cocoa (lighter color, fruitier flavor) or Dutch processed cocoa (darker, richer, less acidic). Both work! Do not use hot chocolate mix.
- Oil: Canola, vegetable, or refined coconut oil work best. Olive oil will add a distinct flavor.
- Chocolate Chips: Feel free to swap for an equal weight of chopped dark chocolate, milk chocolate, or even peanut butter chips. Using chocolate chunks will create larger, gooey pockets.
- Add Ins: After folding in the chips, you can gently fold in 3/4 cup of toasted walnuts, pecans, or shredded coconut.
Serving Suggestions
Side Dish & Topping Pairings
These brownies are sublime on their own, but they can be elevated into a show stopping dessert. Serve a warm square (gently reheated) à la mode with a scoop of high quality vanilla bean ice cream. For a decadent twist, drizzle with salted caramel sauce or a quick raspberry coulis. A simple dusting of powdered sugar or a sprinkle of flaky sea salt just before serving adds a beautiful finishing touch.
Wine/Drink Pairing
The deep chocolate flavor pairs wonderfully with a glass of Cabernet Sauvignon or a Port. For a non alcoholic pairing, try a glass of cold whole milk, a dark roast cold brew coffee, or a cherry flavored sparkling water to complement the chocolate notes.
Frequently Asked Questions (FAQ)
Can I double this recipe?
Absolutely! Double all ingredients and bake in a 9×13 inch metal pan. The baking time will increase; start checking at 35 minutes and it may take up to 40-45 minutes. Look for the same visual cues: shiny top, cracked surface, set edges, and a slightly jiggly center.
I only have an 8×8 inch pan. Can I use it?
You can, but your brownies will be much thicker. You must increase the baking time significantly; start checking at 35 minutes, and it could take 40-50 minutes. To prevent over browning the edges before the center sets, you can loosely tent the pan with aluminum foil halfway through baking.
My brownies are cakey. What went wrong?
The most likely culprit is overmixing the batter after adding the flour. This develops gluten. Next time, fold just until the last trace of flour disappears. The second possibility is overbaking. Remember, the brownies continue to cook as they cool in the pan.
How do I get my brownies to be extra gooey?
For an ultra fudgy, gooey center, bake for the minimum time (27-28 minutes) and let them cool completely in the pan, then refrigerate for at least 2 hours before cutting. The chilled texture is incredibly fudgy.
Can I use browned butter?
Yes, for a nutty, sophisticated twist! Brown the butter first, then let it cool for about 10 minutes (it should still be liquid but not scalding hot) before combining it with the oil and sugar in Step 2.
Equipment List
- 9×9 inch Metal Baking Pan (Aluminized Steel Recommended): This is the ideal size and material for even heating and proper browning. I highly recommend brands like USA Pan. Glass or ceramic pans require longer baking times and can affect texture.
- Parchment Paper: For easy removal and clean up.
- Medium Saucepan: For melting the butter mixture.
- Large Mixing Bowl: For whisking the eggs and sugar.
- Medium Mixing Bowl & Fine Mesh Sieve: For sifting the dry ingredients.
- Digital Kitchen Scale (Highly Recommended): For the most accurate measurements, especially for flour and cocoa powder. This ensures consistent results.
- Whisk & Flexible Rubber Spatula: The whisk for emulsifying, the spatula for gentle folding.
- Wire Cooling Rack: Essential for proper cooling.
The Best Fudge Brownies (with Crackly Tops)
Ingredients
- 1 cup 120g all purpose flour
- 1/2 teaspoon baking powder
- 1/2 teaspoon salt
- 1/2 cup 43g unsweetened cocoa powder (natural or Dutch process)
- 1 teaspoon espresso powder optional, enhances chocolate flavor
- 3/4 cup 170g unsalted butter
- 2 tablespoons 28ml neutral oil (canola, vegetable, or refined coconut)
- 1 and 1/3 cups 265g granulated sugar, divided
- 2 large eggs at room temperature
- 1 large egg yolk at room temperature
- 2 teaspoons pure vanilla extract optional but recommended
- 3/4 cup 128g semi sweet chocolate chips
Instructions
- Prep: Preheat oven to 350°F (175°C). Line a 9x9 inch metal baking pan with parchment paper, leaving an overhang on two sides. Lightly grease the paper.
- Dry Ingredients: In a medium bowl, sift together the flour, baking powder, salt, cocoa powder, and espresso powder (if using). Set aside.
- Butter Mixture: In a medium saucepan over medium heat, combine the butter, oil, and 1/3 cup (65g) of the sugar. Heat, stirring, until the butter is just melted. Remove from heat.
- Egg Mixture: In a large bowl, vigorously whisk the eggs, egg yolk, vanilla, and the remaining 1 cup (200g) of sugar for about 30 seconds until pale and well combined.
- Temper: Very slowly, in a thin stream, pour the warm butter mixture into the egg mixture, whisking constantly until fully combined and smooth.
- Combine: Add the dry ingredients and chocolate chips to the wet ingredients. Using a rubber spatula, gently fold until just combined; stop when you no longer see dry flour streaks. Do not overmix.
- Bake: Pour the batter into the prepared pan and smooth the top. Bake for 28-30 minutes, until the top is shiny and cracked, the edges are set, and the center has a slight jiggle.
- Cool: Place the pan on a wire rack and let the brownies cool completely in the pan (at least 2 hours) before lifting out with the parchment paper and slicing.
Notes
- For Gooey Brownies: Bake for 27-28 minutes.
- For Chewier Brownies: Bake for 30-32 minutes.
- Key to Crackly Top: Whisk eggs and sugar well, and slowly temper with the hot butter mixture.
- Key to Fudgy Texture: Do not overmix the batter after adding flour, and do not overbake.
- Storage: Keep in an airtight container at room temp for 3 days, in the fridge for 5 days, or freeze for up to 3 months.


")

