


There’s a certain kind of magic that happens in a cast iron skillet. It’s a kitchen workhorse that transforms simple ingredients into extraordinary meals, and these Cast Iron Chicken Thighs are the ultimate proof. If you’ve ever wanted to make chicken with skin so shatteringly crisp it rivals your favorite restaurant, while keeping the meat beneath impossibly juicy, this is your recipe. It’s a masterclass in technique that delivers maximum flavor with minimal effort, making it perfect for both a busy Tuesday night and a special weekend dinner.
My love affair with this dish started on a quest to recreate the perfect roast chicken flavor without heating up my entire oven. I wanted the sear of a skillet and the tender finish of a braise, all in one pan. The inspiration was pure, practical artistry: using the cast iron’s incredible heat retention to create a crispy exterior, then building a simple pan sauce right there with the golden brown bits left behind. This recipe is that happy result; a foolproof method that feels chef-y but is incredibly approachable. It’s become my nonnegotiable go to for impressing guests and treating my family to something truly special.
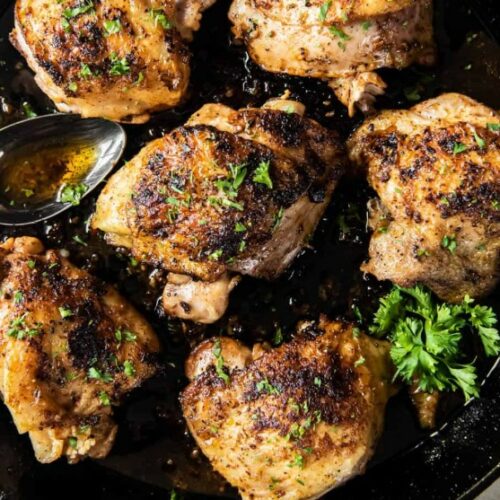
Flavor & Texture Profile: This dish is a study in beautiful contrasts. The chicken skin becomes deeply golden, crispy, and crackling, seasoned with a smoky savory blend of paprika, garlic, and onion powder. Beneath that irresistible crust, the dark meat of the thighs stays unbelievably moist, tender, and juicy. The quick pan sauce, made by deglazing the skillet with broth, is rich and deeply savory, carrying the essence of the rendered chicken fat and spices. A finish of fresh parsley adds a final, bright note that ties every luxurious bite together.
Chef’s Secrets for Perfect Cast Iron Chicken
Follow these simple pro tips for a flawless result every single time:
- The Dryness is Key: Before you even think about seasoning, pat the chicken thighs completely dry with paper towels. Removing surface moisture is the single most important step to achieving skin that crisps and browns instead of steaming.
- Season Under the Skin: For the most flavorful chicken, gently lift the skin and sprinkle a little of your spice mix directly onto the meat before doing the exterior. This seasons the chicken all the way through.
- Don’t Move the Chicken! When you first place the chicken in the hot skillet, skin side down, resist the urge to poke or move it for a full 5 minutes. This undisturbed searing is what creates an even, golden brown crust that releases cleanly from the pan.
- Trust the Thermometer, Not the Clock: Oven temperatures and thigh sizes vary. The only way to guarantee perfect doneness is to use an instant read thermometer. Pull the chicken when it reaches 165°F at the thickest part, knowing it will carry over to a safe 170°F as it rests.
Make Ahead, Storage & Freezing Instructions
- Make Ahead: You can season the chicken thighs up to 24 hours in advance. Store them uncovered on a plate in the refrigerator; this actually helps dry the skin out further for an even crispier result.
- Storage: Store leftover chicken and any pan sauce in an airtight container in the refrigerator for up to 3 days.
- Reheating: To preserve the crispy skin, reheat in a 325°F oven. Place the chicken on a baking sheet (skin side up) and warm for 10-15 minutes until heated through. For quicker reheating, use the microwave, but note the skin will soften.
- Freezing: Cooked chicken thighs freeze well for up to 3 months. Cool completely, wrap tightly in plastic wrap and then aluminum foil, and freeze. Thaw overnight in the refrigerator before reheating. The pan sauce does not freeze well due to its fat content.
Step by Step Instructions
1Heat the Skillet: Place your large (12 inch) cast iron skillet on the stovetop and add the 2 tablespoons of olive oil. Heat over medium heat for a few minutes until the oil shimmers.
2Dry & Season the Chicken: While the skillet heats, use paper towels to pat the chicken thighs completely dry on all sides. In a small bowl, mix the paprika, garlic powder, onion powder, salt, and pepper. Sprinkle this seasoning mix generously over both sides of each thigh, rubbing it in gently.
3Sear, Skin Side Down: Carefully place the chicken thighs in the hot skillet, skin side down. Let them cook, undisturbed, for 5-7 minutes. Do not move them! This creates the foundational crispy crust.
4Flip & Finish Cooking: Using tongs, flip each chicken thigh. Cook on the second side for another 5-6 minutes, or until the meat is cooked through and the internal temperature reaches 165°F.
5Make the Pan Sauce: Push the cooked chicken to one side of the skillet. Add the butter and minced garlic to the empty space. Cook for about 1 minute until the garlic is fragrant. Pour in the chicken broth (or white wine), and use a wooden spoon to scrape up all the flavorful browned bits (fond) from the bottom of the pan.
6Reduce & Glaze: Increase the heat to medium high and let the sauce simmer for 1-2 minutes, until it reduces by about half and slightly thickens. You can spoon this sauce over the chicken as it finishes.
7Rest & Serve: Remove the skillet from the heat. Let the chicken rest for 5 minutes to allow the juices to redistribute. Garnish with freshly chopped parsley and serve immediately with the pan sauce drizzled on top.
Ingredient Substitutions & Dietary Swaps
- Gluten Free: This recipe is naturally gluten free. Just double check that your chicken broth is a certified gluten free brand if you have celiac disease or a severe sensitivity.
- Dairy Free: To make this dairy free, simply omit the butter or replace it with an additional tablespoon of olive oil or a dairy free butter alternative.
- Common Substitutes:
- Chicken Broth: Dry white wine (like Sauvignon Blanc or Pinot Grigio) is an excellent substitute for a more complex, acidic sauce. You can also use a combination of half broth and half wine.
- Spice Blend: Don’t have onion powder? Use an extra 1/4 teaspoon of garlic powder. Smoked paprika can replace regular paprika for a deeper, smokier flavor.
- Chicken Thighs: Bone in, skin on chicken breasts can be used, but they will cook faster. Reduce the cook time by 2-3 minutes per side and watch the temperature closely to avoid dryness.
Serving Suggestions & Pairings
This versatile chicken is the star of any plate. Here’s how to build a memorable meal around it:
- Side Dish Pairings: Serve over a bed of creamy mashed potatoes or buttery polenta to soak up the delicious pan sauce. For a lighter option, pair with roasted vegetables (like asparagus or broccoli) or a simple arugula salad with a lemon vinaigrette.
- Wine/Drink Pairing: A medium bodied Chardonnay (unoaked or lightly oaked) or a Pinot Noir complements the rich, savory flavors beautifully. For a non alcoholic option, a sparkling apple cider or rosemary infused lemonade is delightful.
FAQ: Your Cast Iron Chicken Questions, Answered
- Q: My skin is sticking to the pan! What am I doing wrong?
- A: Sticking usually means the pan wasn’t hot enough when you added the chicken, or you moved it too soon. Ensure the oil is shimmering before adding the thighs, and let them sear undisturbed to form a crust that naturally releases.
- Q: Can I make this without a cast iron skillet?
- A: Yes, any heavy bottomed, oven safe skillet (like stainless steel) will work. However, cast iron is ideal for its superior heat retention and ability to create an excellent sear that leads to a crispier skin.
- Q: How can I tell when the chicken is done without a thermometer?
- A: The juices should run clear when the thickest part of the thigh is pierced with a knife or fork. However, an instant read thermometer is a small investment that guarantees perfect, safe results every time and is highly recommended.
- Q: Is it necessary to use bone in, skin on thighs?
- A: For this specific method, yes. The bone helps conduct heat evenly, preventing the meat from drying out, and the skin is essential for creating the signature crispy texture and flavorful fat for the sauce. Boneless, skinless thighs will cook faster and won’t achieve the same result.
Essential Equipment
- 12 Inch Cast Iron Skillet: The essential tool. A well seasoned Lodge or similar brand skillet provides perfect, even heating for the sear and is safe for making the pan sauce.
- Instant Read Thermometer: Crucial for checking doneness accurately without cutting into the chicken and losing its precious juices.
- Tongs: For safely flipping the chicken thighs without piercing the skin and releasing juices.
- Microplane or Garlic Press: For mincing the garlic finely so it melts into the sauce without burning.
- Wooden Spoon or Silicone Spatula: For deglazing the pan and scraping up the flavorful browned bits without scratching your cast iron.
Crispy Cast Iron Chicken Thighs with Garlic Pan Sauce
Ingredients
- 2 tablespoons extra virgin olive oil
- 6 bone in skin on chicken thighs (about 1 ½ to 2 pounds)
- 1 teaspoon paprika
- 1 teaspoon garlic powder
- ½ teaspoon onion powder
- ½ teaspoon kosher salt plus more to taste
- Freshly ground black pepper to taste
- 2 tablespoons unsalted butter
- 3 cloves garlic minced
- ½ cup chicken broth or dry white wine
- Fresh parsley chopped, for garnish
Instructions
- Heat olive oil in a large (12 inch) cast iron skillet over medium heat.
- Pat the chicken thighs completely dry with paper towels. In a small bowl, mix the paprika, garlic powder, onion powder, salt, and pepper. Season both sides of the chicken generously.
- Place the chicken in the hot skillet, skin side down. Cook undisturbed for 5-7 minutes, until the skin is deep golden brown and crispy.
- Flip the chicken and cook for another 5-6 minutes, until cooked through and the internal temperature reaches 165°F.
- Push chicken to one side of the skillet. Add butter and minced garlic to the empty space. Cook for 1 minute until fragrant.
- Pour in the chicken broth, scraping the bottom of the pan with a wooden spoon to release the browned bits. Simmer for 1-2 minutes until the sauce reduces slightly.
- Remove from heat. Let chicken rest for 5 minutes. Garnish with fresh parsley and serve with the pan sauce.


