")
")


")


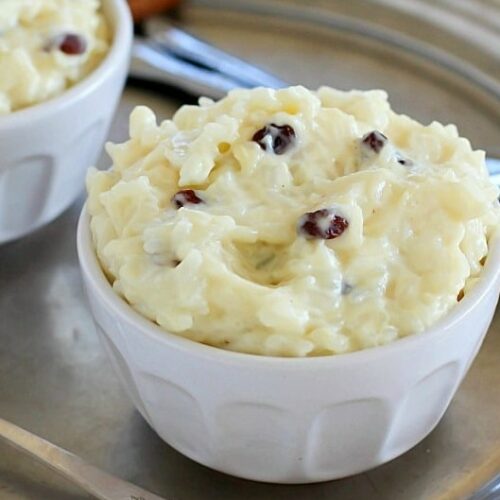
Let me take you back to a chilly November evening a few years ago. I was already fully in the holiday spirit, and I’d just bought my first carton of eggnog of the season. There’s something about that first sip; the thick, creamy, spiced flavor; that instantly transports me to Christmas mornings past. As I stood in my kitchen, savoring the moment, I started thinking about another one of my all time favorite comfort desserts: rice pudding. The idea hit me like a bolt of festive inspiration. What if I combined the two? What if I made a rice pudding using rich, creamy eggnog instead of regular milk? The result was nothing short of pure magic. This Eggnog Rice Pudding is now my signature holiday dessert. It’s the dish I bring to gatherings, the treat I make for cozy nights by the fire, and the recipe that has everyone asking for seconds. It’s creamy, it’s spiced, it’s absolutely irresistible.
Let’s talk about what makes this dessert so special. The flavor is pure holiday comfort in a bowl. The rich, creamy, spiced notes of eggnog; with its signature hints of nutmeg and vanilla infuse every single bite. This is perfectly complemented by the subtle sweetness from the sugar and the chewy bursts of plump raisins. The texture is absolutely dreamy: the rice becomes incredibly tender, creating a soft base, while the pudding itself is luxuriously thick and creamy. A final dusting of cinnamon and nutmeg on top adds a warm, aromatic finish. Every spoonful is like a warm, cozy hug.
Secrets to Perfect Eggnog Rice Pudding
These pro tips are your guarantee for a perfectly creamy, never fail pudding every single time.
- Use Long Grain Rice: Long grain rice, like regular white long grain or jasmine, is ideal for rice pudding. It holds its shape well during cooking, resulting in tender, distinct grains rather than a mushy porridge. Avoid short grain or arborio rice, which release more starch and can become too sticky.
- Stir, Stir, Stir! This is the most important rule, especially after you add the egg. Constant stirring prevents the mixture from scorching on the bottom of the pan and, most crucially, ensures the beaten egg incorporates smoothly into the hot pudding without scrambling into lumps. A gentle, frequent stir is your best friend here.
- Cook the Rice First: This recipe uses a two step method for a reason. Cooking the rice separately in water first ensures it’s perfectly tender before it ever meets the eggnog. This prevents the dairy from over reducing or scorching during the long rice cooking time.
- Serve Warm or Chilled: This pudding is delicious both ways! Serve it warm, straight from the stove, for the ultimate cozy dessert. Or, let it chill in the refrigerator for a few hours; it will thicken up even more and become a delightfully cool, creamy treat.
Make Ahead, Storage & Freezing Instructions
This dessert is perfect for making ahead, which is a huge bonus during the busy holiday season.
- Make Ahead Champion: You can make this pudding up to 3 days in advance. Prepare it as directed, let it cool completely, then cover and store it in the refrigerator. The flavors will meld beautifully, and the texture will become even thicker and creamier.
- Storing Leftovers: Store any leftovers in an airtight container in the refrigerator for up to 4 days.
- Reheating: To reheat, place the desired amount in a small saucepan over low heat. Stir in a splash of milk or eggnog to thin it back to a creamy consistency, and warm gently. You can also reheat individual portions in the microwave.
- Freezing Instructions: I do not recommend freezing this rice pudding. The texture of both the rice and the dairy based custard can become grainy and separate upon thawing, resulting in a less than ideal dessert. It’s best enjoyed fresh or as a refrigerated leftover.
Step by Step Instructions
Prep Time: 5 minutes | Cook Time: 40 minutes | Total Time: 45 minutes
Follow these simple steps for a foolproof, decadent dessert.
1Cook the Rice: In a medium saucepan, bring 1 ½ cups of water to a rolling boil. Stir in the ¾ cup of long grain rice. Reduce the heat to low, cover the pan, and let it simmer gently for about 20 minutes, or until the water is fully absorbed and the rice is tender.
2Measure Rice: Once cooked, measure out 1 ½ cups of the cooked rice. (Any leftover rice can be saved for another use.) Place this measured rice into a clean saucepan.
3Add Eggnog Base: To the saucepan with the rice, add the 1 ½ cups of eggnog, the sugar (or sugar substitute), and the ⅛ teaspoon of salt.
4Cook Until Creamy: Place the saucepan over medium low heat. Cook, stirring frequently, for about 15 minutes, or until the mixture becomes thick and creamy. The rice will continue to absorb the liquid.
5Add Milk, Egg, and Raisins: In a small bowl, lightly beat the egg. Pour the milk into the saucepan, then slowly drizzle in the beaten egg while stirring constantly. Add the raisins. This constant stirring is crucial to prevent the egg from scrambling.
6Finish Cooking: Continue to cook for another 2-4 minutes, stirring frequently, until the pudding is creamy and heated through. Do not let it boil.
7Add Vanilla and Serve: Remove the pan from the heat. Stir in the ½ teaspoon of vanilla extract. Serve immediately, either warm or chilled. Dust each serving with a generous sprinkle of ground cinnamon and nutmeg.
Customize It: Ingredient Substitutions
This recipe is wonderfully adaptable to different tastes and dietary needs.
- Gluten Free: This recipe is naturally gluten free! Just double check that your eggnog brand is certified gluten free (most are, but it’s always good to verify).
- Dairy Free/Vegan: This is possible with a few swaps. Use a high quality dairy free eggnog (many brands make almond, oat, or coconut based versions). Substitute the regular milk with the same unsweetened plain non dairy milk (like almond or oat milk). You’ll also need to replace the egg. A common trick for thickening is to use 2 tablespoons of cornstarch mixed with a little cold non dairy milk, stirred in at the end and simmered until thickened, though the texture will be slightly different from a custard. You could also try a commercial egg replacer.
- Lower Sugar: The recipe already includes an option for a sugar substitute like Truvia. You can also use your preferred granulated sweetener. If using a liquid sweetener like honey or maple syrup, you may need to reduce the milk slightly.
- Common Pantry Swaps:
- Rice: While long grain is preferred, you can use medium grain white rice in a pinch. Avoid instant rice, as the texture will be too mushy.
- Raisins: Not a raisin fan? Swap them for dried cranberries for a festive tartness, or chopped dried apricots or dates. You can also omit them entirely.
- Spices: In addition to the cinnamon and nutmeg garnish, you can stir a pinch of ground cloves or allspice into the pudding along with the vanilla for even more warm holiday spice.
- Eggnog: If you don’t have store bought eggnog, you can make a quick substitute by whisking together milk, cream, sugar, nutmeg, and a touch of vanilla, though it won’t be quite as thick and rich.
Serving Suggestions: How to Enjoy Your Pudding
This versatile dessert is perfect on its own, but here are a few ways to dress it up.
- The Simple Way: Serve it in small bowls or cups, simply dusted with cinnamon and nutmeg. It’s elegant and perfect.
- Make it a Parfait: Layer the chilled rice pudding in a glass with crushed gingerbread cookies or shortbread and a dollop of whipped cream for a stunning holiday parfait.
- Add a Boozy Kick (for Adults): For an adult treat, stir a tablespoon of rum, brandy, or bourbon into the pudding just before serving. It’s absolutely divine.
- Beverage Pairings: The creamy, spiced flavors are a natural match for a warm cup of coffee, a latte, or a spiced chai tea. A glass of milk is always a classic choice. For a non alcoholic holiday toast, sparkling apple cider is perfect.
Essential Equipment List
- Medium Saucepan (2-3 quart): For cooking the rice.
- Second Medium Saucepan (2-3 quart): For combining the cooked rice with the eggnog and finishing the pudding.
- Measuring Cups and Spoons
- Wooden Spoon or Silicone Spatula: For stirring frequently without scratching your pan.
- Small Bowl: For beating the egg.
- Serving Bowls or Cups
Frequently Asked Questions (FAQ)
- Can I use leftover cooked rice?
Yes, you can absolutely use leftover cooked rice to save even more time! You’ll need 1 ½ cups of cooked long grain rice. Skip step 1 and start directly with step 2, adding the cooked rice to the clean saucepan with the eggnog. - My pudding turned out too thick. Can I thin it?
Absolutely! Rice pudding will continue to thicken as it cools. If it’s thicker than you’d like, simply stir in a splash of warm milk or eggnog until it reaches your desired creamy consistency. - My pudding has lumps of cooked egg. What happened?
This happens if the egg is added too quickly or the mixture isn’t stirred constantly. The key is to add the beaten egg slowly while stirring vigorously, and to keep stirring over the low heat. Don’t worry, even with a few small lumps, it will still taste delicious! - Can I make this in a slow cooker or Instant Pot?
This stovetop recipe is designed for simplicity and speed. While you could potentially adapt it, I haven’t tested it in a slow cooker or pressure cooker. For a guaranteed perfect result, I recommend sticking to the stovetop method.
Eggnog Rice Pudding
Ingredients
- ¾ cup long grain white rice
- 1 ½ cups water
- 1 ½ cups eggnog such as International Delight Nog
- ⅛ teaspoon salt
- 2 tablespoons sugar substitute like Truvia OR 4 tablespoons granulated sugar
- ½ cup milk
- 1 large egg beaten
- ⅓ cup raisins
- ½ teaspoon vanilla extract
- Ground cinnamon and nutmeg for serving
Instructions
- Cook Rice: In a medium saucepan, bring water to a boil. Stir in rice. Reduce heat to low, cover, and simmer for about 20 minutes, until water is absorbed and rice is tender.
- Combine: Measure out 1 ½ cups of the cooked rice and place it in a clean saucepan. Add the eggnog, sugar, and salt.
- Cook Pudding: Cook over medium low heat, stirring frequently, for about 15 minutes, until the mixture is creamy and thickened.
- Add Remaining Ingredients: Stir in the milk, then slowly drizzle in the beaten egg while stirring constantly (this prevents scrambling). Add the raisins. Continue cooking for another 2-4 minutes, stirring frequently, until creamy and heated through.
- Finish and Serve: Remove from heat and stir in the vanilla. Serve warm or chilled, dusted with cinnamon and nutmeg.
Notes
- Stirring is Key: Constant stirring, especially after adding the egg, prevents lumps and scorching.
- Make Ahead: Can be made up to 3 days ahead and stored in the fridge. It will thicken as it chills. Reheat gently with a splash of milk.
- Substitutions: For a dairy free version, use dairy free eggnog and non dairy milk. The egg can be omitted, but the texture will be less custard like (try 2 tbsp cornstarch mixed with cold milk as a thickener).
- Storage: Store leftovers in an airtight container in the refrigerator for up to 4 days. Not recommended for freezing.


