
")

")


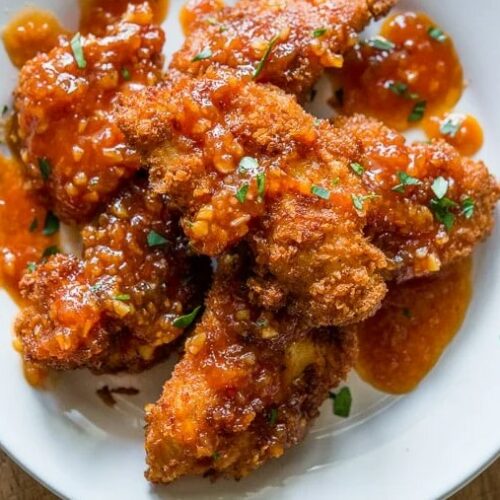
Have you ever ordered those perfect, crispy, sweet and spicy chicken appetizers at a restaurant and wished you could recreate that magic at home? That exact craving was the inspiration for this recipe. I wanted to capture the irresistible appeal of takeout; crispy, golden brown chicken coated in a sticky, savory, and slightly spicy sauce; but in a way that was easy, approachable, and far more rewarding. These Asian Chicken Strips with Garlic Chili Sauce are my answer. They’re the perfect project for a fun Friday night dinner, a surefire hit for game day, and the kind of homemade meal that will have everyone asking, “Can you make these again next week?” Forget the delivery app; this is your ticket to a restaurant worthy experience right from your own kitchen.
Flavor Profile: Get ready for a party in your mouth. The chicken itself is crispy, golden brown, and tender, with a light, airy crunch from the panko coating. But the star is the incredible Garlic Chili Sauce. It’s a complex blend of savory, sweet, tangy, and spicy all at once. You’ll taste the deep, aromatic punch of sautéed garlic and shallot, the sweet umami from brown sugar and ketchup, a bright tang from rice vinegar, and a building, customizable heat from the Sriracha. The sauce clings perfectly to each crispy strip, creating an addictive contrast between the crunchy exterior and the juicy chicken inside. It’s bold, it’s flavorful, and it’s absolutely irresistible.
Expert Tips for the Crispiest Chicken & Best Sauce
- The Double Dredge is Key: For a coating that really sticks and fries up extra crispy, use the classic flour egg panko method. First, lightly coat the dry chicken in all purpose flour (this gives the egg something to grab onto). Then dip in the beaten egg, and finally, press firmly into the panko breadcrumbs to ensure a good, even coating.
- Rest the Coated Chicken: After breading, place the chicken strips on a wire rack for 10-15 minutes before frying. This allows the coating to set and dry slightly, which prevents it from sloughing off in the hot oil and results in a much crispier final product.
- Control Your Oil Temperature: This is the most crucial step for non greasy chicken. Use a deep fry or candy thermometer and keep your oil at a steady 350°F (175°C). If the oil is too cool, the chicken will absorb oil and become soggy. If it’s too hot, the outside will burn before the inside cooks through.
- Sauce to Order: For the crispiest experience, toss the chicken in the sauce just before serving. If you sauce the chicken too early or let it sit, the crispy coating will soften. Alternatively, serve the sauce on the side as a dip to maintain maximum crunch.
Make Ahead, Storage & Freezing
- Make Ahead: You can make the garlic chili sauce up to 5 days in advance and store it in an airtight container in the fridge. Gently reheat it before tossing with the chicken. You can also bread the chicken strips, place them in a single layer on a baking sheet, and refrigerate for up to 4 hours before frying.
- Storage & Reheating: Leftovers are best stored with the sauce separate from the chicken to preserve texture. Store in airtight containers in the fridge for up to 3 days. Reheat chicken in an air fryer or toaster oven at 375°F for 5-7 minutes to re crisp. The microwave will make it soft.
- Freezing for Meal Prep: These are fantastic for freezing! Freeze the uncooked, breaded chicken strips in a single layer on a parchment lined baking sheet until solid, then transfer to a freezer bag. They can be fried directly from frozen, adding 2-3 minutes to the cooking time. You can also freeze the sauce separately.
Step by Step Instructions
Part 1: Make the Garlic Chili Sauce
1In a small saucepan, heat the 2 tablespoons of vegetable oil over medium heat. Add the minced garlic and shallot. Cook, stirring frequently, for 2-3 minutes until they become fragrant and just start to turn lightly golden. Do not let them burn.
2To the pan, add the fish sauce (or soy sauce), brown sugar, rice vinegar, ketchup, and Sriracha (start with 1 tablespoon for mild, 2 for spicy). Whisk everything together until smooth.
3Reduce the heat to low and let the sauce simmer gently for 3-4 minutes, allowing the flavors to meld and the sauce to thicken slightly. If it becomes too thick, thin it with a tablespoon of water. Remove from heat and set aside.
Part 2: Prepare & Fry the Chicken Strips
4Set up your breading station: Place the all purpose flour in a shallow bowl. In a second bowl, beat the 2 eggs. Place the panko breadcrumbs in a third shallow bowl.
5Dredge the chicken: Working with one strip at a time, coat the chicken lightly in the flour, shaking off the excess. Next, dip it fully into the beaten egg, letting any excess drip off. Finally, press it firmly into the panko breadcrumbs, ensuring an even, generous coating on all sides. Place the breaded strip on a wire rack. Repeat with all chicken.
6Heat the oil: Pour oil into a large, heavy bottomed pot or Dutch oven to a depth of about 1 inch. Heat over medium high heat until it reaches 350°F (175°C) on a deep fry thermometer.
7Fry the chicken: Working in batches to avoid overcrowding, carefully add the chicken strips to the hot oil. Fry for 3-4 minutes per side, or until the coating is deep golden brown and the chicken is cooked through (internal temperature of 165°F). Transfer the cooked chicken to a clean wire rack set over a baking sheet to drain (this keeps them crispier than draining on paper towels).
Part 3: Serve
8Briefly reheat the sauce if it has cooled. You can either toss all the hot chicken strips in a large bowl with the sauce until evenly coated, or serve the sauce on the side for dipping. Garnish with sliced green onions and sesame seeds if desired. Serve immediately.
Ingredient Substitutions & Dietary Swaps
- Gluten Free: Use tamari or coconut aminos instead of soy sauce/fish sauce. For breading, swap the all purpose flour for rice flour or cornstarch, and use certified gluten free panko breadcrumbs.
- Dairy Free: This recipe is naturally dairy free.
- Paleo/Whole30: Use coconut aminos instead of soy/fish sauce, and use arrowroot powder instead of flour. For the breading, you can use a mixture of almond flour and crushed pork rinds, or simply pan sear the chicken without breading and coat in the sauce.
- Common Substitutes: Chicken: This sauce is also fantastic on shrimp, tofu, or cauliflower bites. Fish Sauce: Soy sauce or tamari are fine substitutes, though the flavor will be slightly less complex. Panko: Regular breadcrumbs or crushed cornflakes will work, but panko gives the best crunch. Sriracha: Any chili garlic sauce, sambal oelek, or even a bit of gochujang (thinned with water) will work.
Serving Suggestions
These versatile strips can be the star of the show in several ways.
- As an Appetizer: Serve the saucy strips or dipping sauce in the center of a platter, garnished with sesame seeds and green onions. Provide toothpicks for easy grabbing.
- As a Main Course: Serve over a bed of steamed jasmine rice or cauliflower rice to soak up the extra sauce. Add a side of quick pickled cucumbers or a simple Asian inspired slaw for a fresh, crunchy contrast.
- In a Bowl: Create a nourish bowl with rice, the chicken strips, steamed broccoli, shredded carrots, and edamame. Drizzle with extra sauce.
- Beverage Pairing: A cold, crisp lager, an unoaked Chardonnay, or a ginger beer all pair wonderfully. For a non alcoholic option, try iced jasmine tea or sparkling water with lime.
Frequently Asked Questions (FAQ)
- Can I bake or air fry these instead of deep frying?
Absolutely! For a lighter version, preheat your air fryer to 400°F (200°C). Spray the breaded chicken strips lightly with oil and air fry for 10-12 minutes, flipping halfway, until golden and cooked through. You can also bake them on a wire rack set over a baking sheet at 425°F (220°C) for 15-20 minutes. - My sauce is too spicy/not spicy enough. Can I adjust it?
Yes! The beauty of this sauce is its customizability. Start with 1 tablespoon of Sriracha and taste after simmering. You can add more for heat, a bit more brown sugar to sweeten and balance, or a splash of vinegar for extra tang. - Can I use chicken breasts instead of tenders?
Yes. Slice boneless, skinless chicken breasts into 1 inch thick strips against the grain. They may need an extra minute or two of cooking time depending on thickness. - What’s the best oil for frying?
Use an oil with a high smoke point and neutral flavor, such as vegetable, canola, peanut, or avocado oil.
Recommended Equipment
- Large Heavy Bottomed Pot or Dutch Oven (for frying)
- Deep Fry/Candy Thermometer
- Wire Racks (for resting breaded chicken and draining cooked chicken)
- Shallow Bowls (for the breading station)
- Tongs
- Small Saucepan
Crispy Asian Chicken Strips with Garlic Chili Sauce
Ingredients
For the Garlic Chili Sauce:
- 2 tbsp vegetable oil
- 5 cloves garlic minced
- 1 large shallot minced (about 2 tbsp)
- 1 tbsp fish sauce or soy sauce/tamari
- 2 tbsp packed light brown sugar
- 2 tbsp rice vinegar
- 3 tbsp ketchup
- 1-2 tbsp Sriracha or chili garlic sauce to taste
For the Chicken Strips:
- 2 lbs chicken tenders or chicken breast strips
- 1 cup all purpose flour
- 2 large eggs beaten
- 2 cups panko breadcrumbs
- Neutral oil like vegetable or canola, for frying (about 1-2 cups)
- Sliced green onions & sesame seeds for garnish (optional)
Instructions
- Make Sauce: Heat oil in saucepan over medium. Sauté garlic & shallot 2-3 mins until fragrant. Add fish sauce, brown sugar, vinegar, ketchup, and Sriracha. Whisk, simmer 3-4 mins on low. Set aside.
- Bread Chicken: Set up bowls with flour, beaten eggs, and panko. Dredge each chicken strip in flour, then egg, then panko, pressing to adhere. Place on wire rack.
- Fry: Heat 1 inch of oil in large pot to 350°F. Fry chicken in batches for 3-4 mins per side until golden and cooked to 165°F. Drain on clean wire rack.
- Serve: Reheat sauce if needed. Toss hot chicken in sauce to coat, or serve sauce on side for dipping. Garnish with green onions and sesame seeds. Serve immediately.
")
")

")


